

Motoforlyfe's Unboxing & Review: BlackVue DR750S-2CH Dash Cam
Posted by The Dashcam Store on Dec 15, 2017
Dirtbike5100, aka Motoforlyfe on YouTube, recently created a comprehensive YouTube video about his initial impressions familiarizing himself with the new BlackVue DR750S-2CH dash cam. In case you're not familiar with his YouTube channel, Motoforlyfe has over 14,000 subscribers and posts all sorts of videos: motorcycles, cars, trucks, engines, and cameras. He also spends a lot of time with his friend 805ROADKING building custom engines, minibikes, tractors, and more.
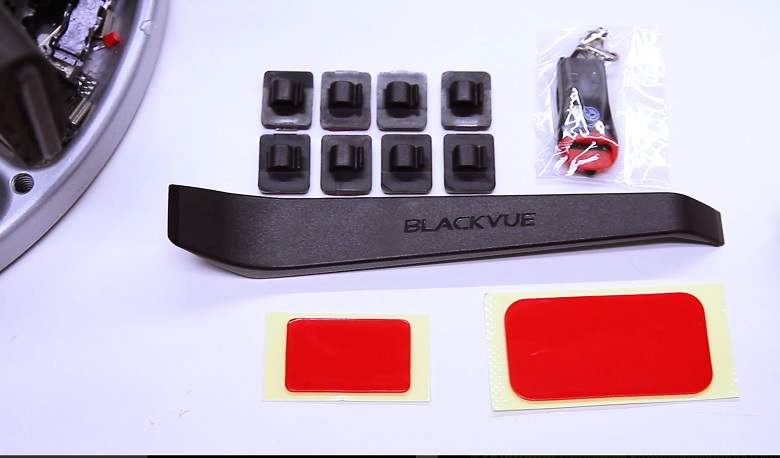 SD card: The dashcam records everything to that one card but you get two separate files each time it makes a recording: one for the front and one for the back.
Power Cord: One end plugs into your master camera and the other end you plug into a cigarette lighter.
Quickstart Guide: The QuickStart guide is a pretty good guide to help you get started. It's got all of the information I needed to understand how this thing worked, but if anybody does end up needing a full manual they do have one available on the BlackVue website.
Accessories: This was probably the thing I was most impressed with! The DR750S-2CH does include a microSD card, and the version I got came with a 16 gigabyte SD card. They also included an adapter so you can read your SD card. You take the micro SD card, plug it in the slot, and then this is a standard USB plug that you can insert into your computer and you're good to go! That way you don't have to worry about getting an adapter on your own, it comes right with the dash cam.
Adhesive Tape: The cameras actually already have double-sided tape on them, but for whatever reason if you need more or maybe decide to move it and you need extra adhesive pads, they give you two more: one big one for the front camera and one smaller one for the rear camera.
Installation Cable Clips: This is another accessory I was really impressed with: they actually give you individual cable holders to hide the cords. I was pretty impressed by that; most of the time they're just going to send you the bare minimum of what you need. This is over and above!
Pry Tool: Speaking of over and above they even sent a pry tool. I was genuinely impressed by this. This is a tool for moving your weather stripping out of the way and tucking wires underneath. Maybe I just have a low level of expectation from typically buying cheaper cameras, but this is what really sets BlackVue apart to me. They actually send you all the tools to install the dash cam, so thumbs up on that.
 The actual cameras themselves on the outside are pretty simple looking; there's not a whole lot to them. It comes with a little lens cap that you can pop off. I don't really see myself leaving the lens cap on there, when you're recording it's not like you're going to cover it up every time you park, but it is nice in case you ever have to store your dash cam.
 The only other connection on the dash cam is this “V”. That's your video connection, and that's where you take the video cable and run it up to the rear camera. The front camera has a little button to release it, so if you press the button the dashcam will spin around and you can actually take the camera body completely out of the windshield mount. This is where you will see your serial number and various information. But otherwise, if you let go of the button it'll snap into place.
As far as connections on the front dash cam go, it’s relatively simple. On the side of the dash cam there is a little cover that you can slide off, and that's how you view everything. Here is where you will find the video input from the other camera, the slot for your SD card, and the power input. You will also find a button, which does two different things: these cameras actually have built-in Wi-Fi, so one of the things you can do with it is you can play back your videos on your cell phone. What you do is you press a little button to turn your Wi-Fi on. If you hold down the button for more than five seconds, it'll actually format your SD card. Personally, I like to format my SD card every once in a while just to be safe. After 5 seconds, the dashcam will talk to you and then hold the button down for another five seconds, and you're done!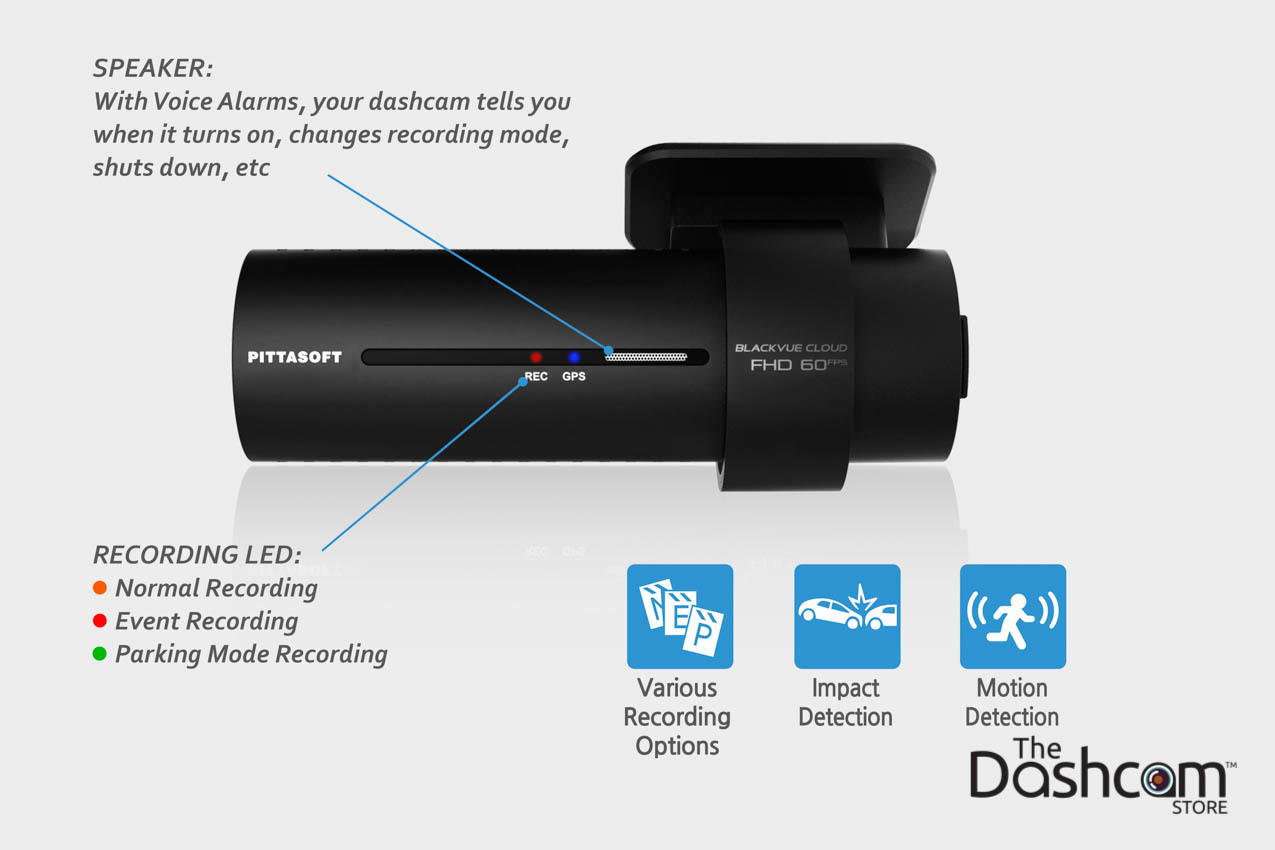 As far as lighting goes, you have some LED indicators. The blue light in the front is pretty much to tell from outside the vehicle what the camera is doing: it'll blink slowly when you're in normal recording and also if it's in standby. If you have a Power Magic Pro installed to utilize the Parking Mode feature, the light will start blinking faster if it detects somebody moving around your car.
If it detects an impact, you'll see the light blinking faster. On the back on the dashcam there are two little LEDs: one says GPS. Now what the GPS light does is it tells you if the GPS is on. One of the other features of this dashcam is it has built-in GPS in it. What that allows you to do is it can show your speed on the video. That way for any reason if you need to know how fast you were going at any given time, you can have your GPS speed right up there on the video footage.
The other LED is an indicator of what mode the camera is in. It will blink orange if you're in a normal mode, which is just normal everyday recording. It will blink faster and be red if there's an event being recorded or if you're manually recording. It will glow green when you're in parking mode and it has detected motion.
Last but not least, on the side of the dashcam there is a Wi-Fi symbol. That simply blinks when you're connected to the internet, or it will glow a solid light when direct Wi-Fi is on. A solid light means you're connected directly to your cell phone and a blinking light means that you're connected to the cloud.
The DR750S-2CH also has a proximity sensor. You can use the proximity sensor to turn the audio on and off. If you wanted to turn off the audio recording, you just swipe your finger next to the proximity sensor and it will shut your audio off. You can change the settings so that a swipe of your finger will start a manual recording trigger instead of enabling/disabling audio recording.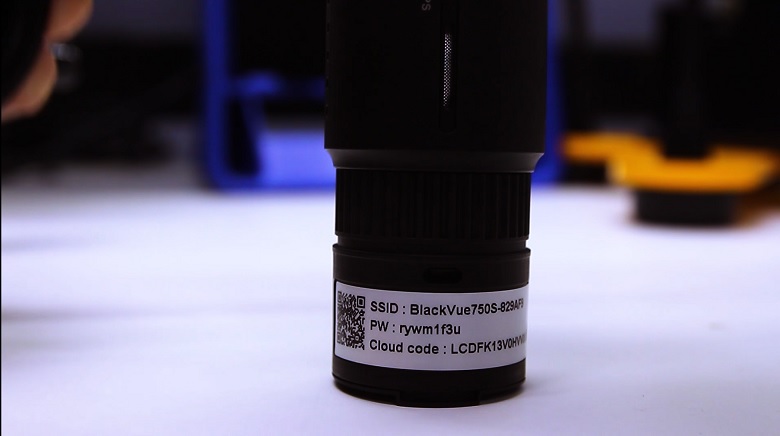 In order to connect your dashcam to W-Fi for the first time, you will need to know the SSID as well as the password. Fortunately, it's very easy to find the password: all you have to do is slide your front dashcam mount out of the way and you can find your unique SSID and password right there on the sticker on the camera. The first line contains your SSID, and another six-digit code right below the SSID will be your password.
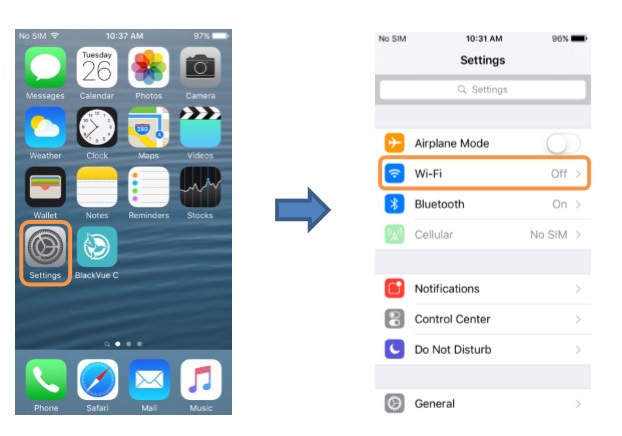 I've gone ahead and opened up my Wi-Fi menu, and as you can see one of the options we have is to connect to the camera, so we'll go ahead and connect it. Obviously, you need to have the camera plugged in in order for this part to work. I've got it hooked up to a power supply on the other side of the room, but typically if you're installing your camera you'll probably have it plugged into the vehicle by this point.
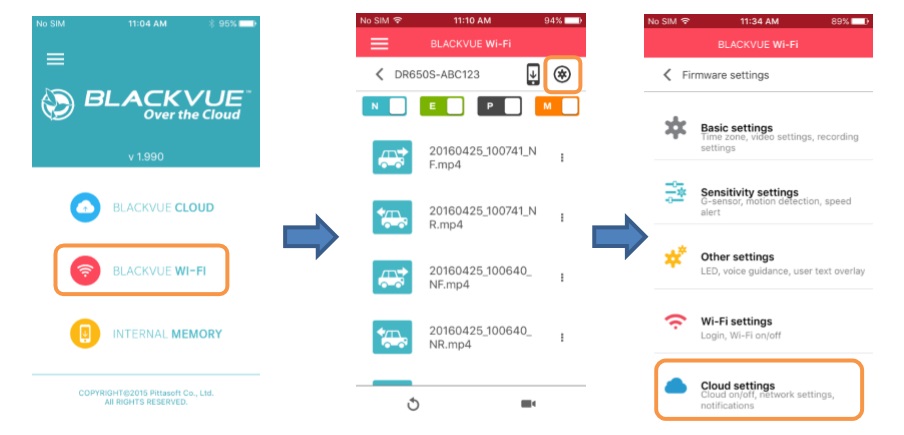
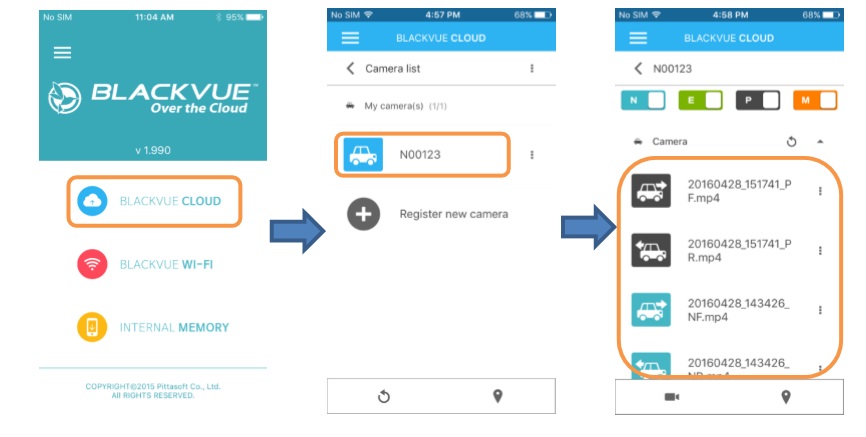
Now, we’ll go ahead and select the network and just go ahead and enter the password that you found under the camera mount. Assuming you type the password correctly (heads up, the password is case sensitive) you should now be connected to the BlackVue device, just like any other network that you would connect to. Now what we’ll do is open up the BlackVue app. Once the app loads, it takes you to a screen with three different options. Choose from BlackVue Cloud, BlackVue Wi-Fi, and internal memory.
Now, we're going to explore the BlackVue Wi-Fi. Once it loads, you can see that every single video that is stored in the camera will pop up. You can see each one is a little icon that pops up, and next to it you can see which camera it was filmed with, whether it was the forward or the rear-facing lens. You may notice that all these are forward-facing, and that’s because currently I don't have the rear dash cam hooked up.
If you tap on a video, it allows you to view a preview of the video and you can even save it to your phone. The BlackVue app also gives you the option to sort between different types of videos. You can look at your normal videos or if I wanted I could look at just the manual videos, or just videos filmed during parking mode. You really have quite a bit of functionality in the app as far as playback goes. The other huge thing that you can do via the BlackVue app is configure all of your firmware settings. Click on the little gear icon, and that will bring you to this screen where you can either configure your firmware settings or if available you can do a firmware update. Here you have your basic settings where you can set your date and time, resolution quality, night vision, brightness, where you can configure your g-sensor settings, motion detection settings, your system settings where you can figure your LEDs, choose what your proximity sensor does, and more.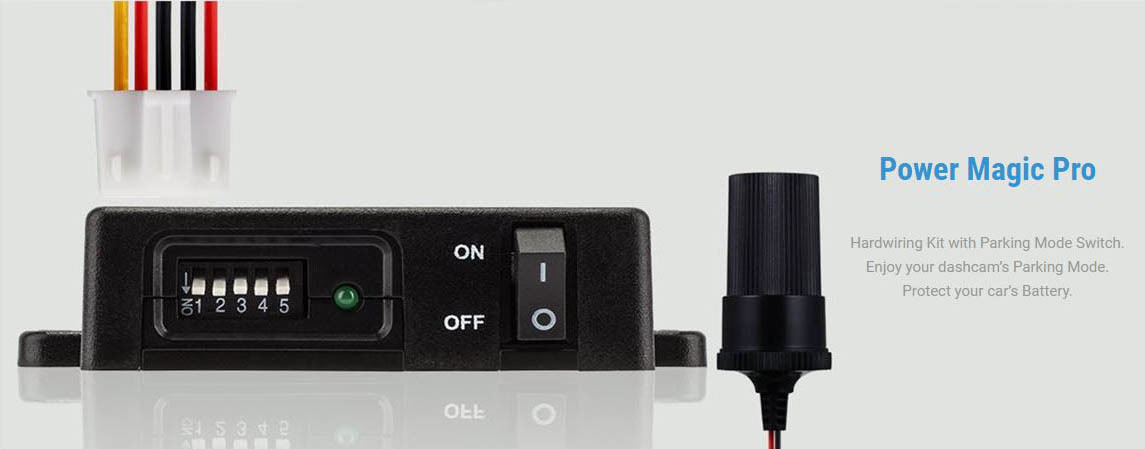 The BlackVue DR750S-2CH has a parking mode feature, and what it does is it will record while you're parked. If it detects motion or an impact while your vehicle is parked, your camera will record the incident. I purchased the Power Magic Pro with my dashcam. It comes with the fuse taps and this little box, and you wire them up together and then hook the camera up to it. The Power Magic Pro has a little power cutoff in it so that way if you get below a certain voltage it won't keep recording and draw down your battery. The Power Magic Pro also has a time limit setting if you if you want to park this thing but you know after a certain amount of time you're not interested in recording anymore, it actually has a time cutoff as well.
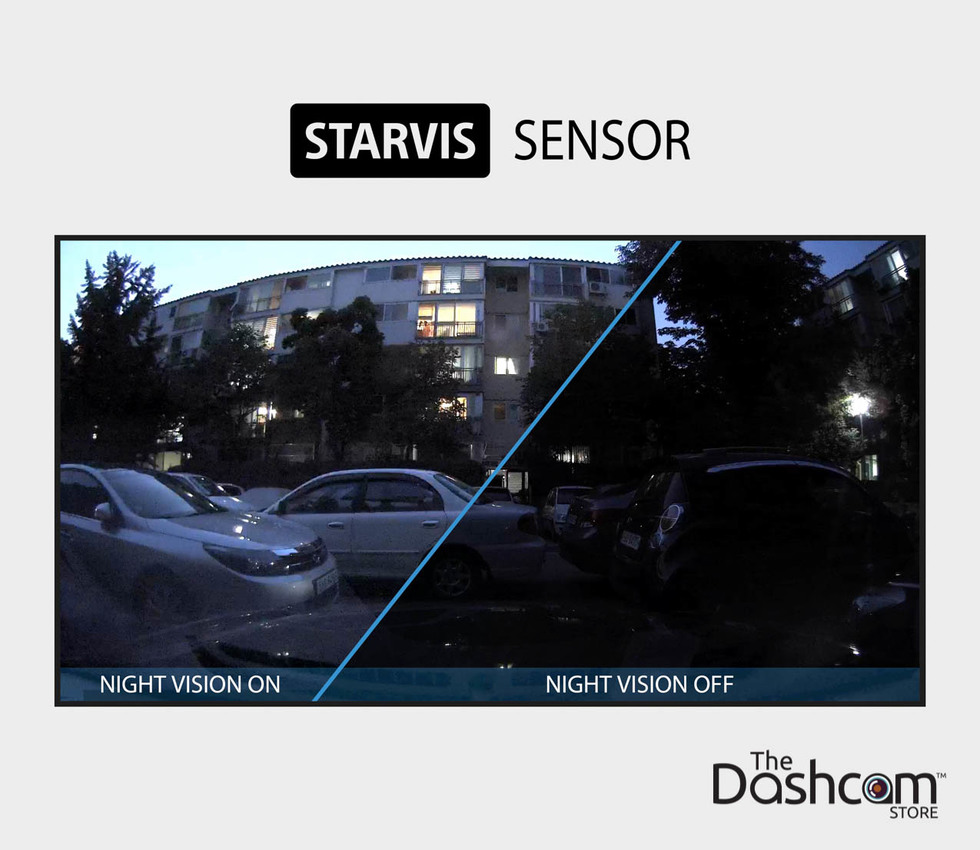
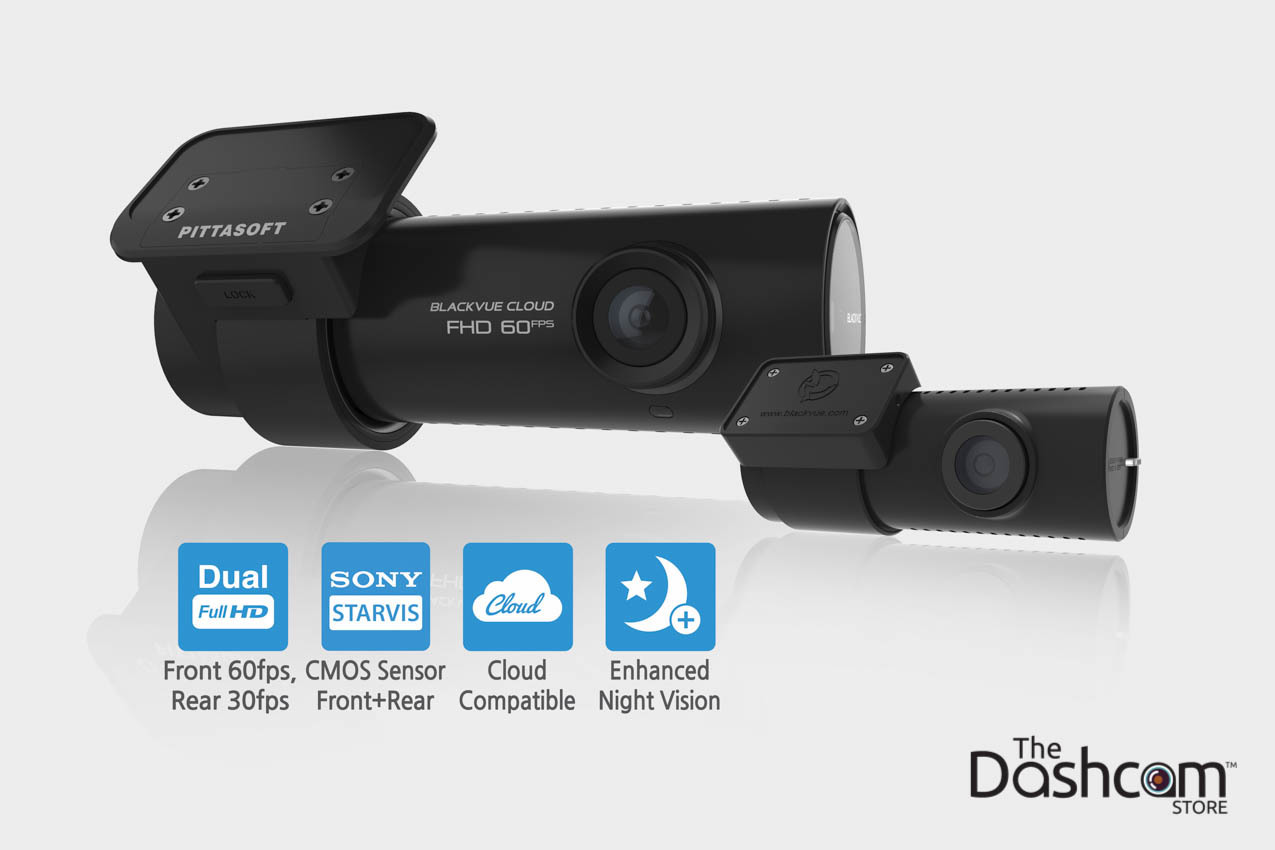
As far as memory capacity, the DR750S-2CH will take a 16 gigabyte, a 32 gigabyte, a 64 gigabyte, or a 128 gigabyte microSD card. Both the front and rear cameras utilize a Sony STARVIS™ sensor and they rated it at approximately 2.1 megapixels. Since they both using the same Sony STARVIS™ sensor, the front diagonal is 139 degrees, the horizontal viewing angle is 116 degrees, and the vertical viewing angle is 61 degrees. As far as resolution and frame rate go, standard recording is full HD 1920 x 1080 at 30 frames per second. If you desire, you can even put it in a sport mode, which will do a full 60 frames per second at Full HD for the front camera while the rear will remain at 30 frames per second. Your average power consumption is 350 milliamps when GPS and Wi-Fi are on and about 300 milliamps when GPS and Wi-Fi are off.
I can't tell you how many times I've had something goofy go on behind me… not that I got hit, but something was going on back there that I wish I would have caught it on camera. I'm really looking forward to this dash cam install. Shopping with The Dashcam Store was nothing but a positive experience. Shipping was super quick, and I want to point out that they're an American company based out of Austin, Texas. I had some questions that I sent it over to them, and they answered my questions super quickly and they actually answered my question as opposed to just giving some generic robot response that didn't really help me at all. They're just great, so check them out!
Motoforlyfe BlackVue DR750S-2CH Dash Cam Overview Video
Overview
First things first: the important thing to understand is that although there are two cameras in the BlackVue DR750S-2CH, you can really think of it as just one dash cam because you can't actually use the two cameras separately. The way it works is using a connection cable, which of course comes with it, you connect the two cameras together and then when they record it records as one unit.What’s Included with the DR750S-2CH
SD card: The dashcam records everything to that one card but you get two separate files each time it makes a recording: one for the front and one for the back.Power Cord: One end plugs into your master camera and the other end you plug into a cigarette lighter.
Quickstart Guide: The QuickStart guide is a pretty good guide to help you get started. It's got all of the information I needed to understand how this thing worked, but if anybody does end up needing a full manual they do have one available on the BlackVue website.
Accessories: This was probably the thing I was most impressed with! The DR750S-2CH does include a microSD card, and the version I got came with a 16 gigabyte SD card. They also included an adapter so you can read your SD card. You take the micro SD card, plug it in the slot, and then this is a standard USB plug that you can insert into your computer and you're good to go! That way you don't have to worry about getting an adapter on your own, it comes right with the dash cam.
Adhesive Tape: The cameras actually already have double-sided tape on them, but for whatever reason if you need more or maybe decide to move it and you need extra adhesive pads, they give you two more: one big one for the front camera and one smaller one for the rear camera.
Installation Cable Clips: This is another accessory I was really impressed with: they actually give you individual cable holders to hide the cords. I was pretty impressed by that; most of the time they're just going to send you the bare minimum of what you need. This is over and above!
Pry Tool: Speaking of over and above they even sent a pry tool. I was genuinely impressed by this. This is a tool for moving your weather stripping out of the way and tucking wires underneath. Maybe I just have a low level of expectation from typically buying cheaper cameras, but this is what really sets BlackVue apart to me. They actually send you all the tools to install the dash cam, so thumbs up on that.
Dashcam Design
The actual cameras themselves on the outside are pretty simple looking; there's not a whole lot to them. It comes with a little lens cap that you can pop off. I don't really see myself leaving the lens cap on there, when you're recording it's not like you're going to cover it up every time you park, but it is nice in case you ever have to store your dash cam.
Setup
The only other connection on the dash cam is this “V”. That's your video connection, and that's where you take the video cable and run it up to the rear camera. The front camera has a little button to release it, so if you press the button the dashcam will spin around and you can actually take the camera body completely out of the windshield mount. This is where you will see your serial number and various information. But otherwise, if you let go of the button it'll snap into place.As far as connections on the front dash cam go, it’s relatively simple. On the side of the dash cam there is a little cover that you can slide off, and that's how you view everything. Here is where you will find the video input from the other camera, the slot for your SD card, and the power input. You will also find a button, which does two different things: these cameras actually have built-in Wi-Fi, so one of the things you can do with it is you can play back your videos on your cell phone. What you do is you press a little button to turn your Wi-Fi on. If you hold down the button for more than five seconds, it'll actually format your SD card. Personally, I like to format my SD card every once in a while just to be safe. After 5 seconds, the dashcam will talk to you and then hold the button down for another five seconds, and you're done!
LED Indicators
As far as lighting goes, you have some LED indicators. The blue light in the front is pretty much to tell from outside the vehicle what the camera is doing: it'll blink slowly when you're in normal recording and also if it's in standby. If you have a Power Magic Pro installed to utilize the Parking Mode feature, the light will start blinking faster if it detects somebody moving around your car.If it detects an impact, you'll see the light blinking faster. On the back on the dashcam there are two little LEDs: one says GPS. Now what the GPS light does is it tells you if the GPS is on. One of the other features of this dashcam is it has built-in GPS in it. What that allows you to do is it can show your speed on the video. That way for any reason if you need to know how fast you were going at any given time, you can have your GPS speed right up there on the video footage.
The other LED is an indicator of what mode the camera is in. It will blink orange if you're in a normal mode, which is just normal everyday recording. It will blink faster and be red if there's an event being recorded or if you're manually recording. It will glow green when you're in parking mode and it has detected motion.
Last but not least, on the side of the dashcam there is a Wi-Fi symbol. That simply blinks when you're connected to the internet, or it will glow a solid light when direct Wi-Fi is on. A solid light means you're connected directly to your cell phone and a blinking light means that you're connected to the cloud.
The DR750S-2CH also has a proximity sensor. You can use the proximity sensor to turn the audio on and off. If you wanted to turn off the audio recording, you just swipe your finger next to the proximity sensor and it will shut your audio off. You can change the settings so that a swipe of your finger will start a manual recording trigger instead of enabling/disabling audio recording.
Settings and Configurations: Connecting to the BlackVue App
One of the things that's a little bit different about this dashcam, at least for me, is the fact that it doesn't have any screen on it. Not only that, it's also very limited in the number of buttons it has on it other than the Wi-Fi / format button and the little proximity sensor. You may ask yourself, “How in the world do you configure all the settings or playback videos?” It’s extremely easy to do this with your smartphone. The process of connecting your dashcam is basically the same as connecting to any standard Wi-Fi network.How to Connect Your Dashcam to Wi-Fi
In order to connect your dashcam to W-Fi for the first time, you will need to know the SSID as well as the password. Fortunately, it's very easy to find the password: all you have to do is slide your front dashcam mount out of the way and you can find your unique SSID and password right there on the sticker on the camera. The first line contains your SSID, and another six-digit code right below the SSID will be your password.
Download the BlackVue App
The next thing you will want to do is download the BlackVue app. I've got an Android, so I went to the Play Store. It will pretty much be the same process for iPhone users, you just go into the App Store or and download the app.
I've gone ahead and opened up my Wi-Fi menu, and as you can see one of the options we have is to connect to the camera, so we'll go ahead and connect it. Obviously, you need to have the camera plugged in in order for this part to work. I've got it hooked up to a power supply on the other side of the room, but typically if you're installing your camera you'll probably have it plugged into the vehicle by this point.Now, we’ll go ahead and select the network and just go ahead and enter the password that you found under the camera mount. Assuming you type the password correctly (heads up, the password is case sensitive) you should now be connected to the BlackVue device, just like any other network that you would connect to. Now what we’ll do is open up the BlackVue app. Once the app loads, it takes you to a screen with three different options. Choose from BlackVue Cloud, BlackVue Wi-Fi, and internal memory.
Now, we're going to explore the BlackVue Wi-Fi. Once it loads, you can see that every single video that is stored in the camera will pop up. You can see each one is a little icon that pops up, and next to it you can see which camera it was filmed with, whether it was the forward or the rear-facing lens. You may notice that all these are forward-facing, and that’s because currently I don't have the rear dash cam hooked up.
If you tap on a video, it allows you to view a preview of the video and you can even save it to your phone. The BlackVue app also gives you the option to sort between different types of videos. You can look at your normal videos or if I wanted I could look at just the manual videos, or just videos filmed during parking mode. You really have quite a bit of functionality in the app as far as playback goes. The other huge thing that you can do via the BlackVue app is configure all of your firmware settings. Click on the little gear icon, and that will bring you to this screen where you can either configure your firmware settings or if available you can do a firmware update. Here you have your basic settings where you can set your date and time, resolution quality, night vision, brightness, where you can configure your g-sensor settings, motion detection settings, your system settings where you can figure your LEDs, choose what your proximity sensor does, and more.
Parking Mode
The BlackVue DR750S-2CH has a parking mode feature, and what it does is it will record while you're parked. If it detects motion or an impact while your vehicle is parked, your camera will record the incident. I purchased the Power Magic Pro with my dashcam. It comes with the fuse taps and this little box, and you wire them up together and then hook the camera up to it. The Power Magic Pro has a little power cutoff in it so that way if you get below a certain voltage it won't keep recording and draw down your battery. The Power Magic Pro also has a time limit setting if you if you want to park this thing but you know after a certain amount of time you're not interested in recording anymore, it actually has a time cutoff as well.
Technical Specs
As far as memory capacity, the DR750S-2CH will take a 16 gigabyte, a 32 gigabyte, a 64 gigabyte, or a 128 gigabyte microSD card. Both the front and rear cameras utilize a Sony STARVIS™ sensor and they rated it at approximately 2.1 megapixels. Since they both using the same Sony STARVIS™ sensor, the front diagonal is 139 degrees, the horizontal viewing angle is 116 degrees, and the vertical viewing angle is 61 degrees. As far as resolution and frame rate go, standard recording is full HD 1920 x 1080 at 30 frames per second. If you desire, you can even put it in a sport mode, which will do a full 60 frames per second at Full HD for the front camera while the rear will remain at 30 frames per second. Your average power consumption is 350 milliamps when GPS and Wi-Fi are on and about 300 milliamps when GPS and Wi-Fi are off.
The Bottom Line
As you guys can see, this is a great dash cam. It's definitely the nicest one I've ever bought by far, just alone by the fact that it has two channels for front and rear recording. That along with all the other features that I just got done going over, I really can't wait to get this thing installed. I know it's going to be great putting it to use and being able to play back video footage on my phone, and having the two channels are things that I've wanted for a long time.I can't tell you how many times I've had something goofy go on behind me… not that I got hit, but something was going on back there that I wish I would have caught it on camera. I'm really looking forward to this dash cam install. Shopping with The Dashcam Store was nothing but a positive experience. Shipping was super quick, and I want to point out that they're an American company based out of Austin, Texas. I had some questions that I sent it over to them, and they answered my questions super quickly and they actually answered my question as opposed to just giving some generic robot response that didn't really help me at all. They're just great, so check them out!