How To Edit Dashcam Footage on a Mac Using Free Software
Posted by The Dashcam Store on Sep 17, 2018
Click on any image below to view a larger version.
Begin by opening the "iMovie" application. You can proceed either by searching for the application on your task bar or the application’s launch pad.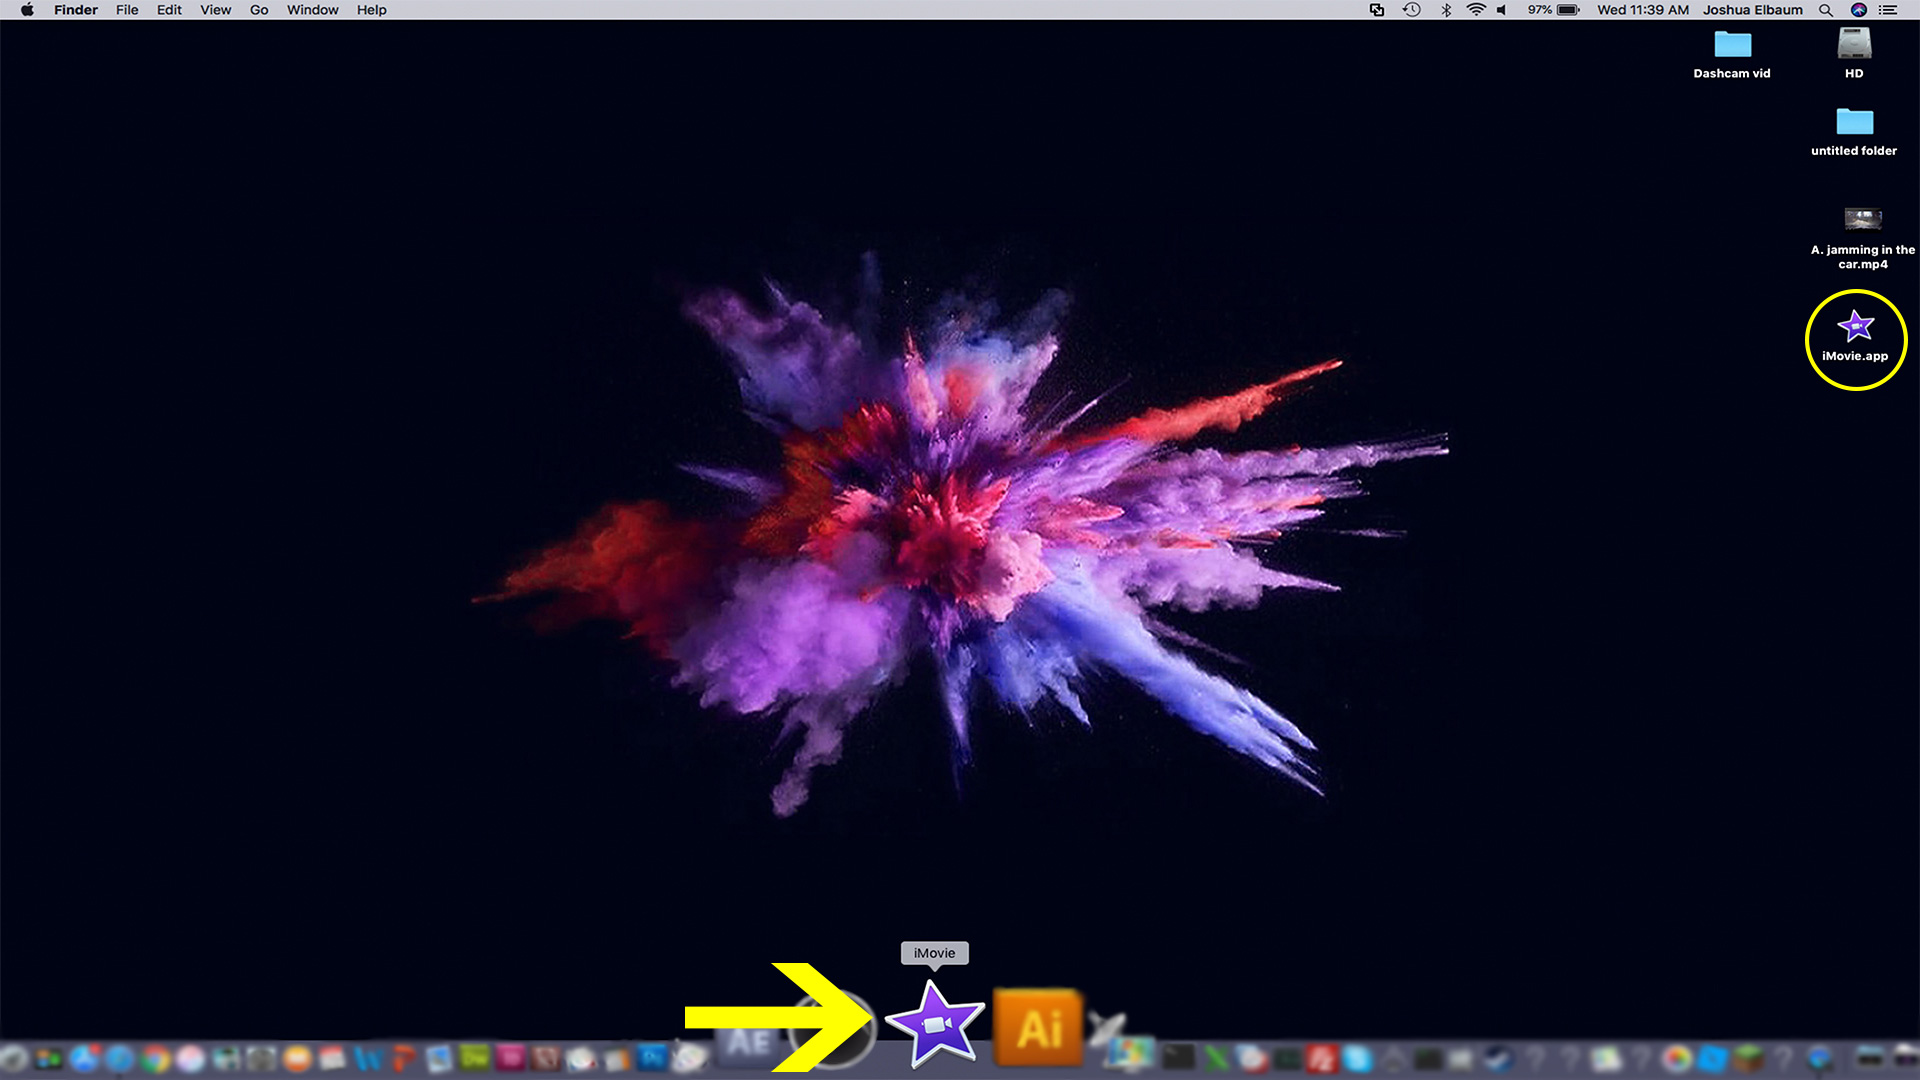
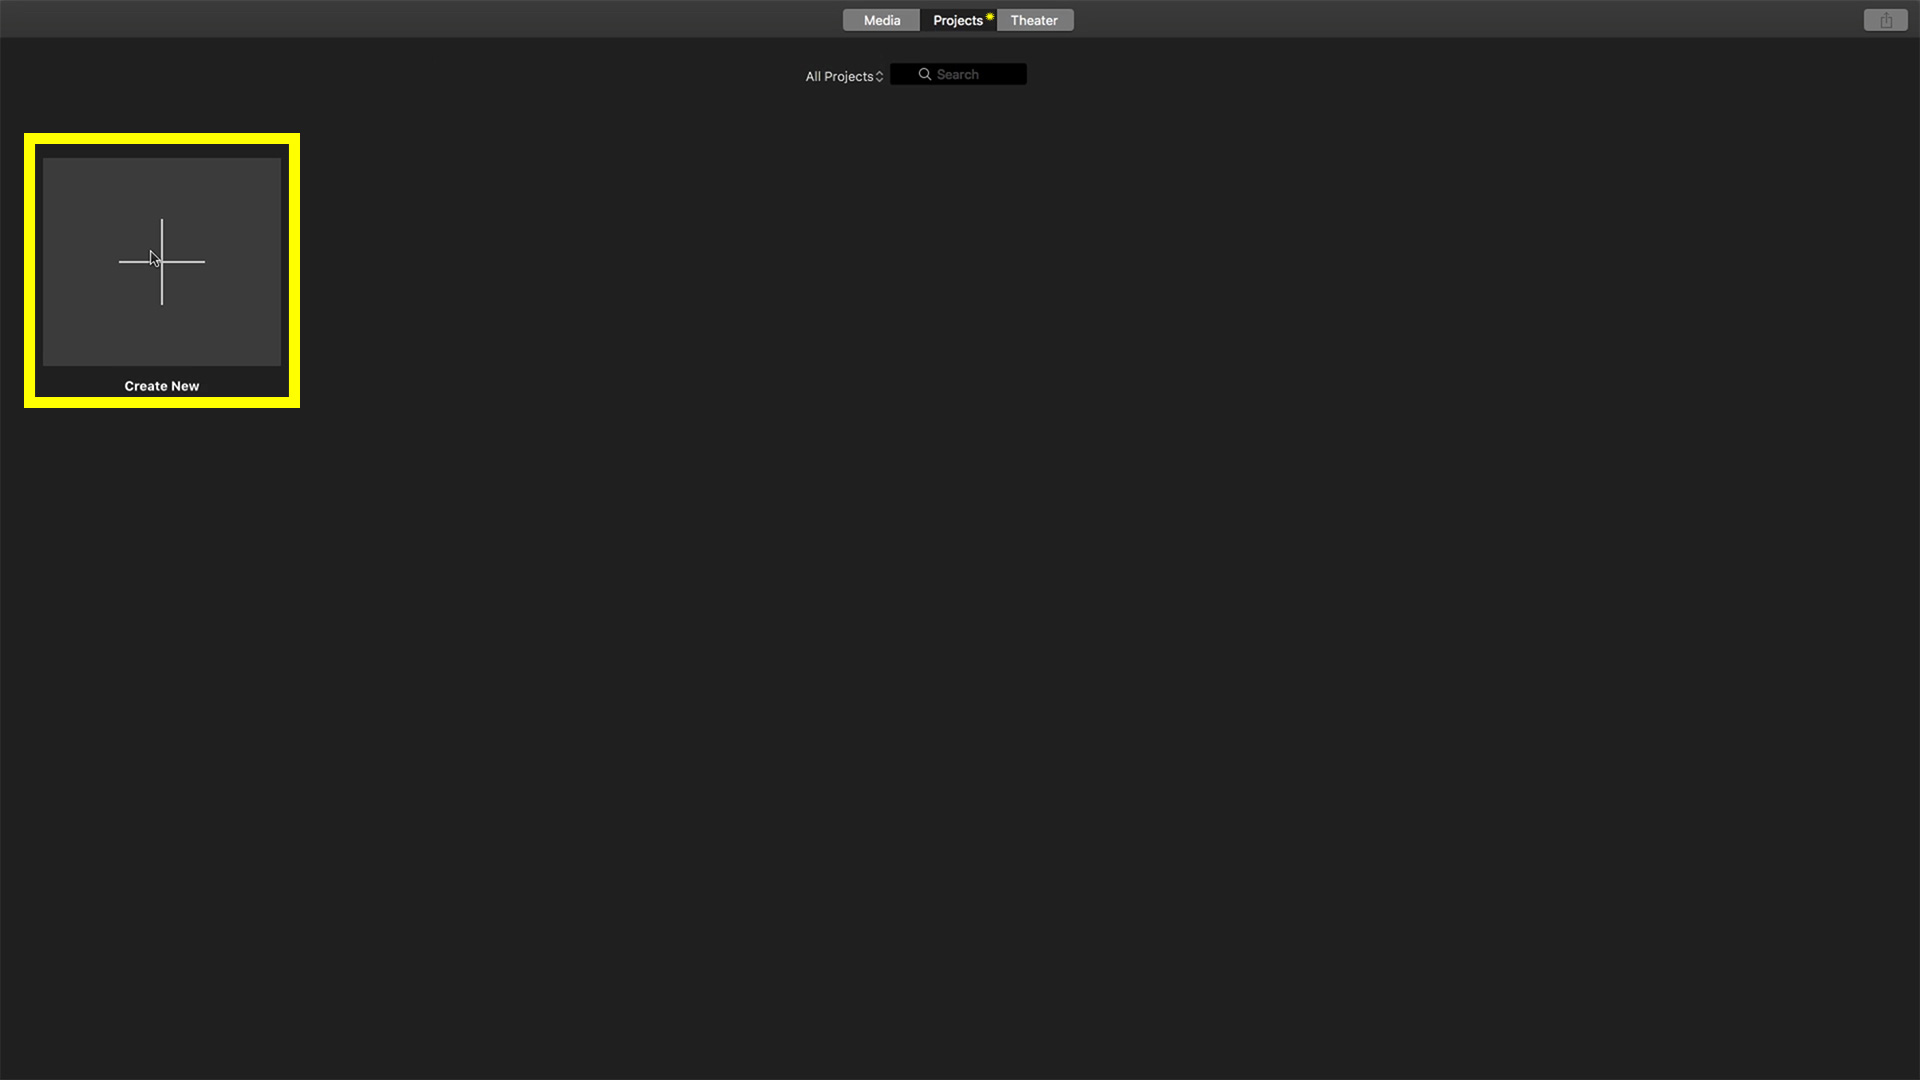
After opening the "iMovie" application, in the "Projects" tab click "Create New"
![How-to: Edit dashcam footage with a Mac]()
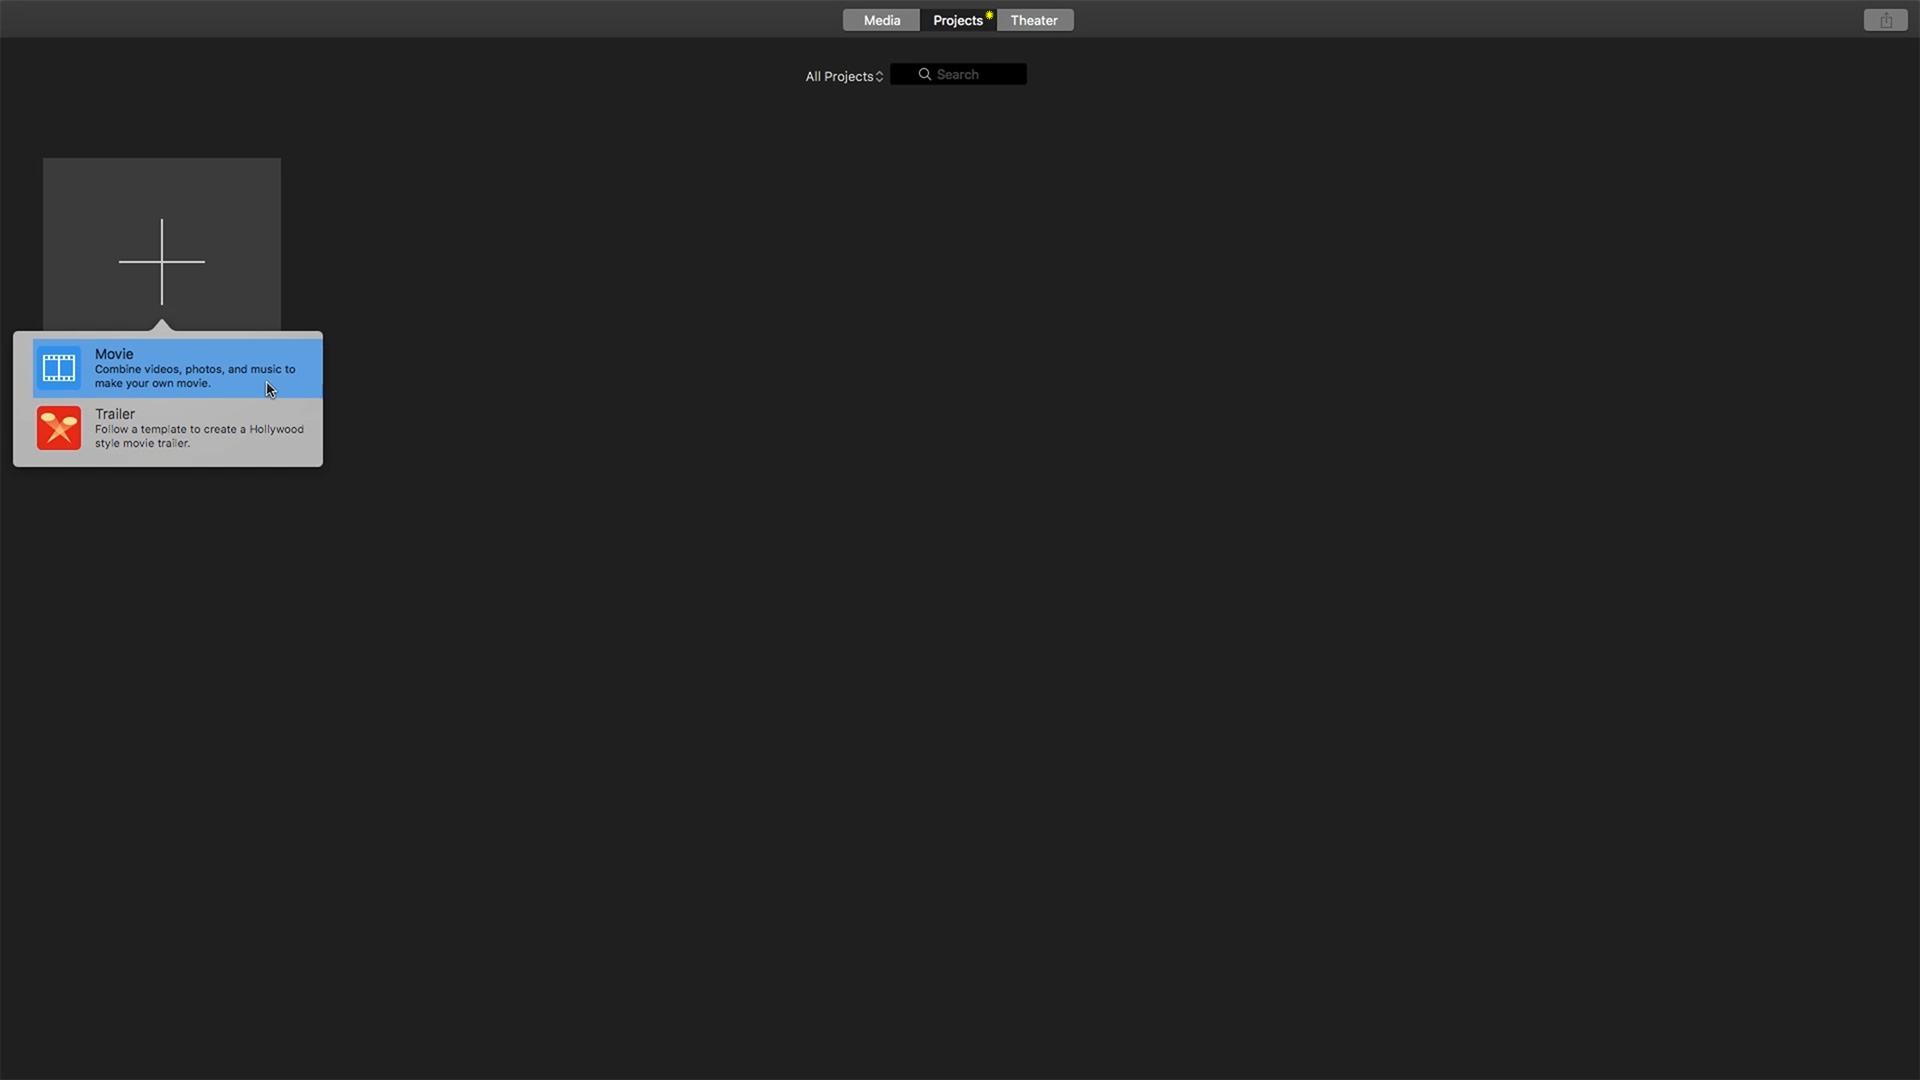
You’ll then be prompted with two options "Movie" and "Trailer". Of the two options today, we’ll be
proceeding with the "Movie" option because it gives us 100% creative control over our video rather than
the "Trailer" option which gives us limited control via usage of templates.
![How-to: Edit dashcam footage with a Mac]()
Let’s begin importing files so we can begin editing our video. There are several ways to import footage into
"iMovie", so you can decide which option best fits you.
![How-to: Edit dashcam footage with a Mac]()
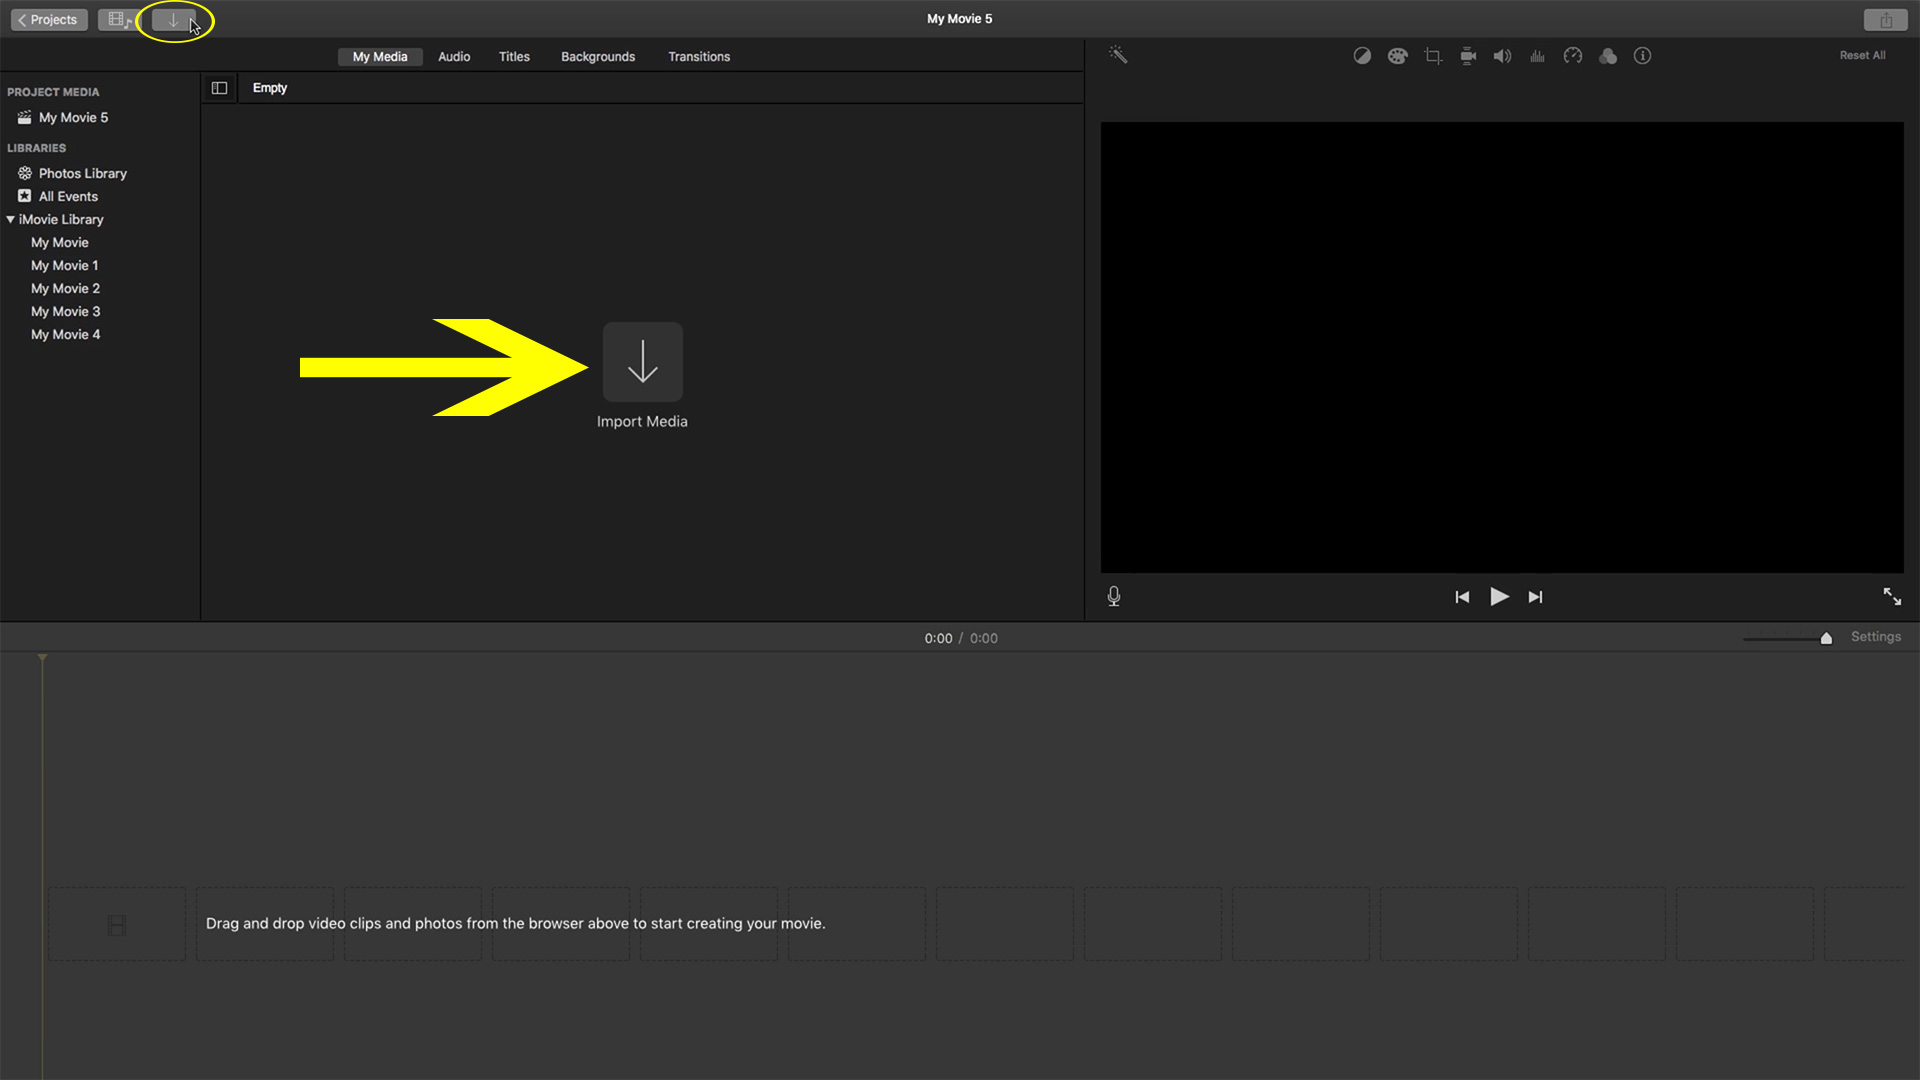
- You can import footage by clicking on the Downward arrow labeled with the text "Import Media" in the center of the screen of the "iMovie" application.
- You can also import files by navigating over to the upper left-hand side of the "iMovie" application and then click on the downward arrow to import media files.
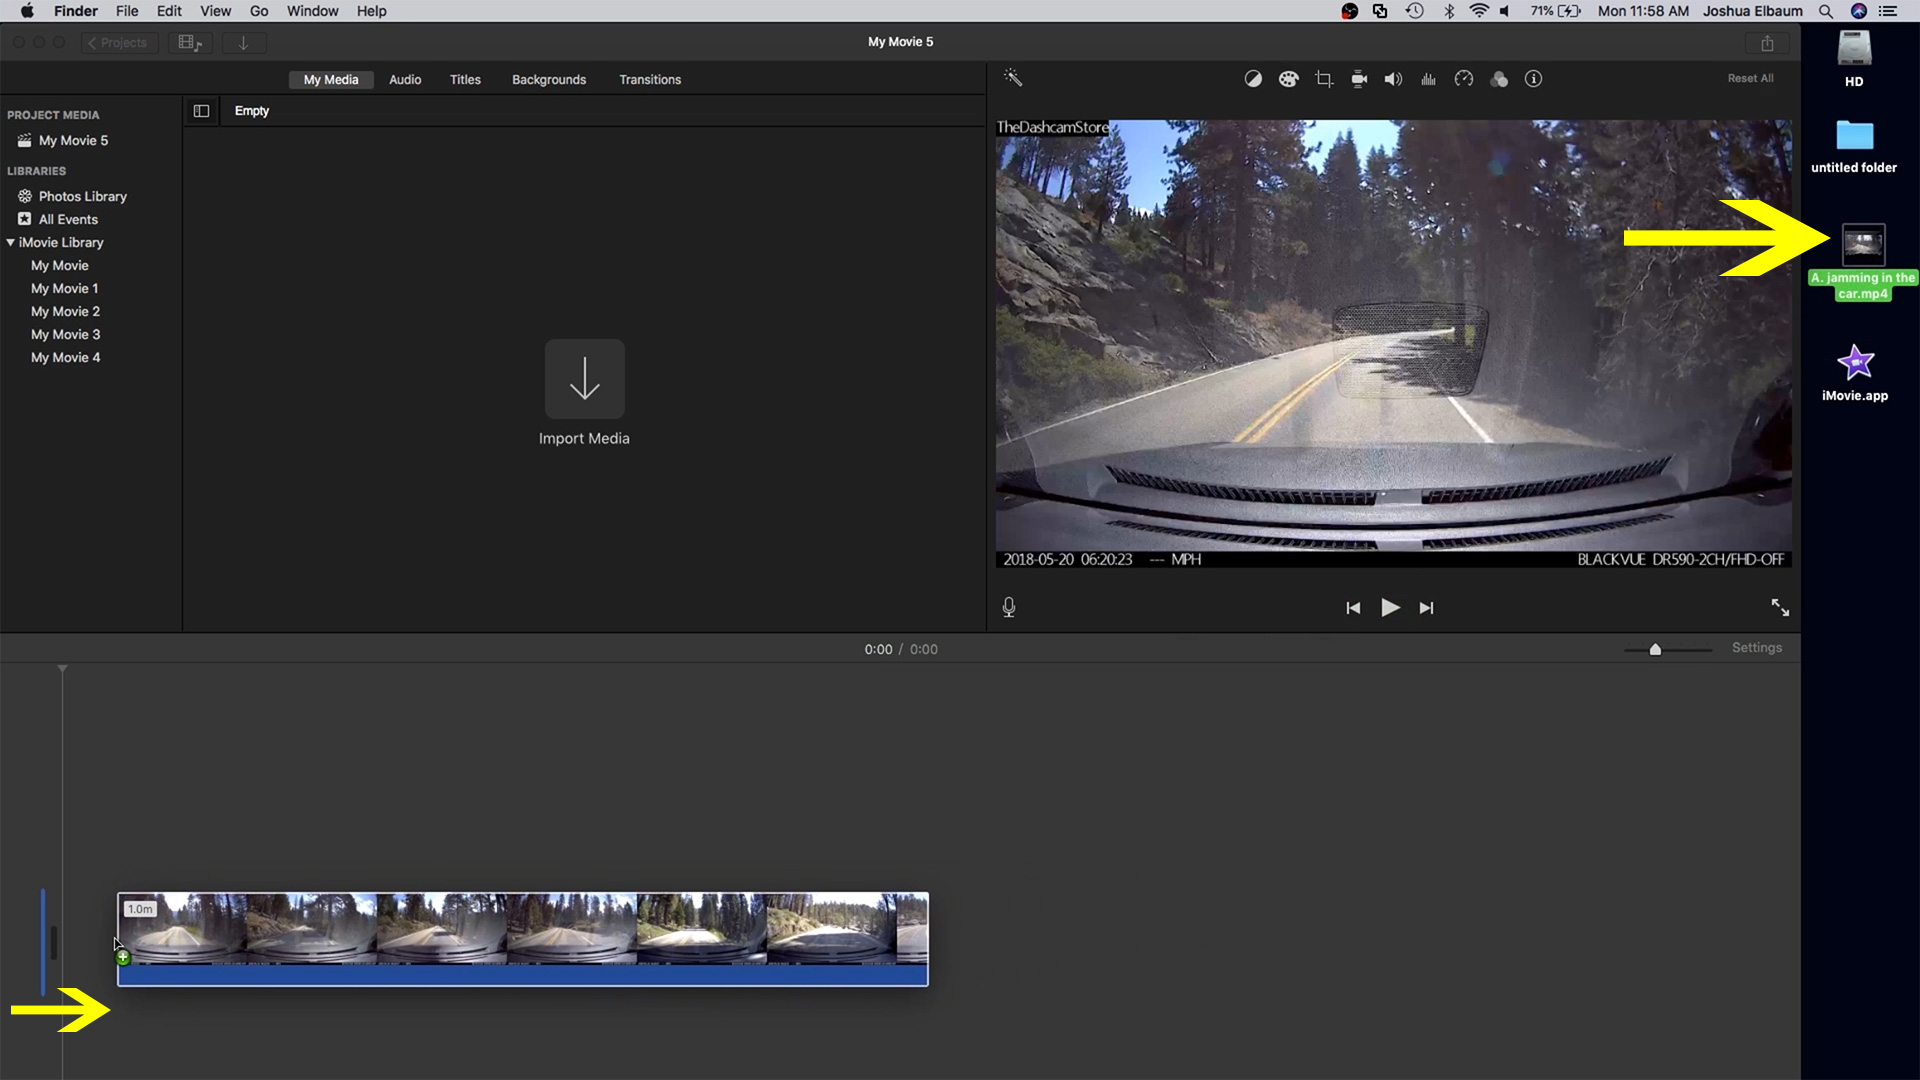
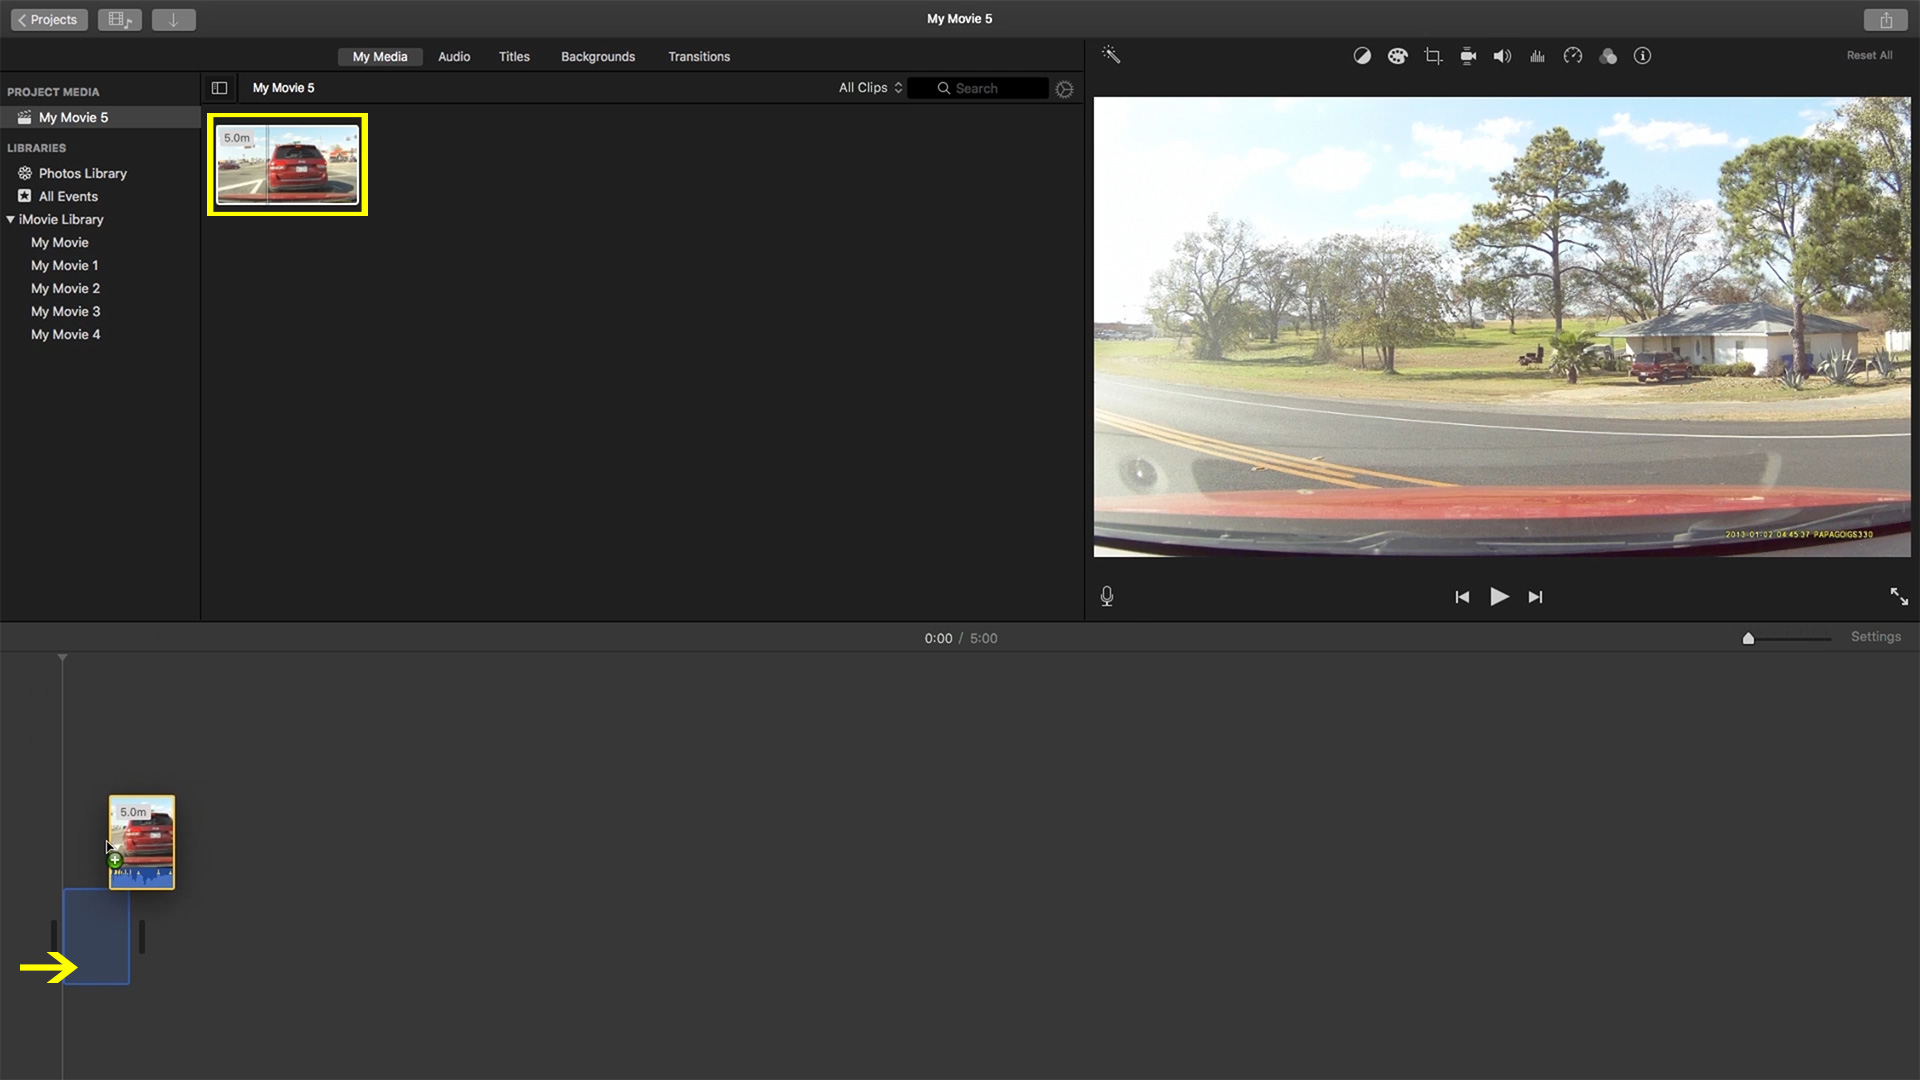
- If you’d rather just drag your media files into "iMovie" that is an option as well, simply select
a clip then drag your files onto the project timeline.
How To Remove Audio from a Dashcam Video Clip
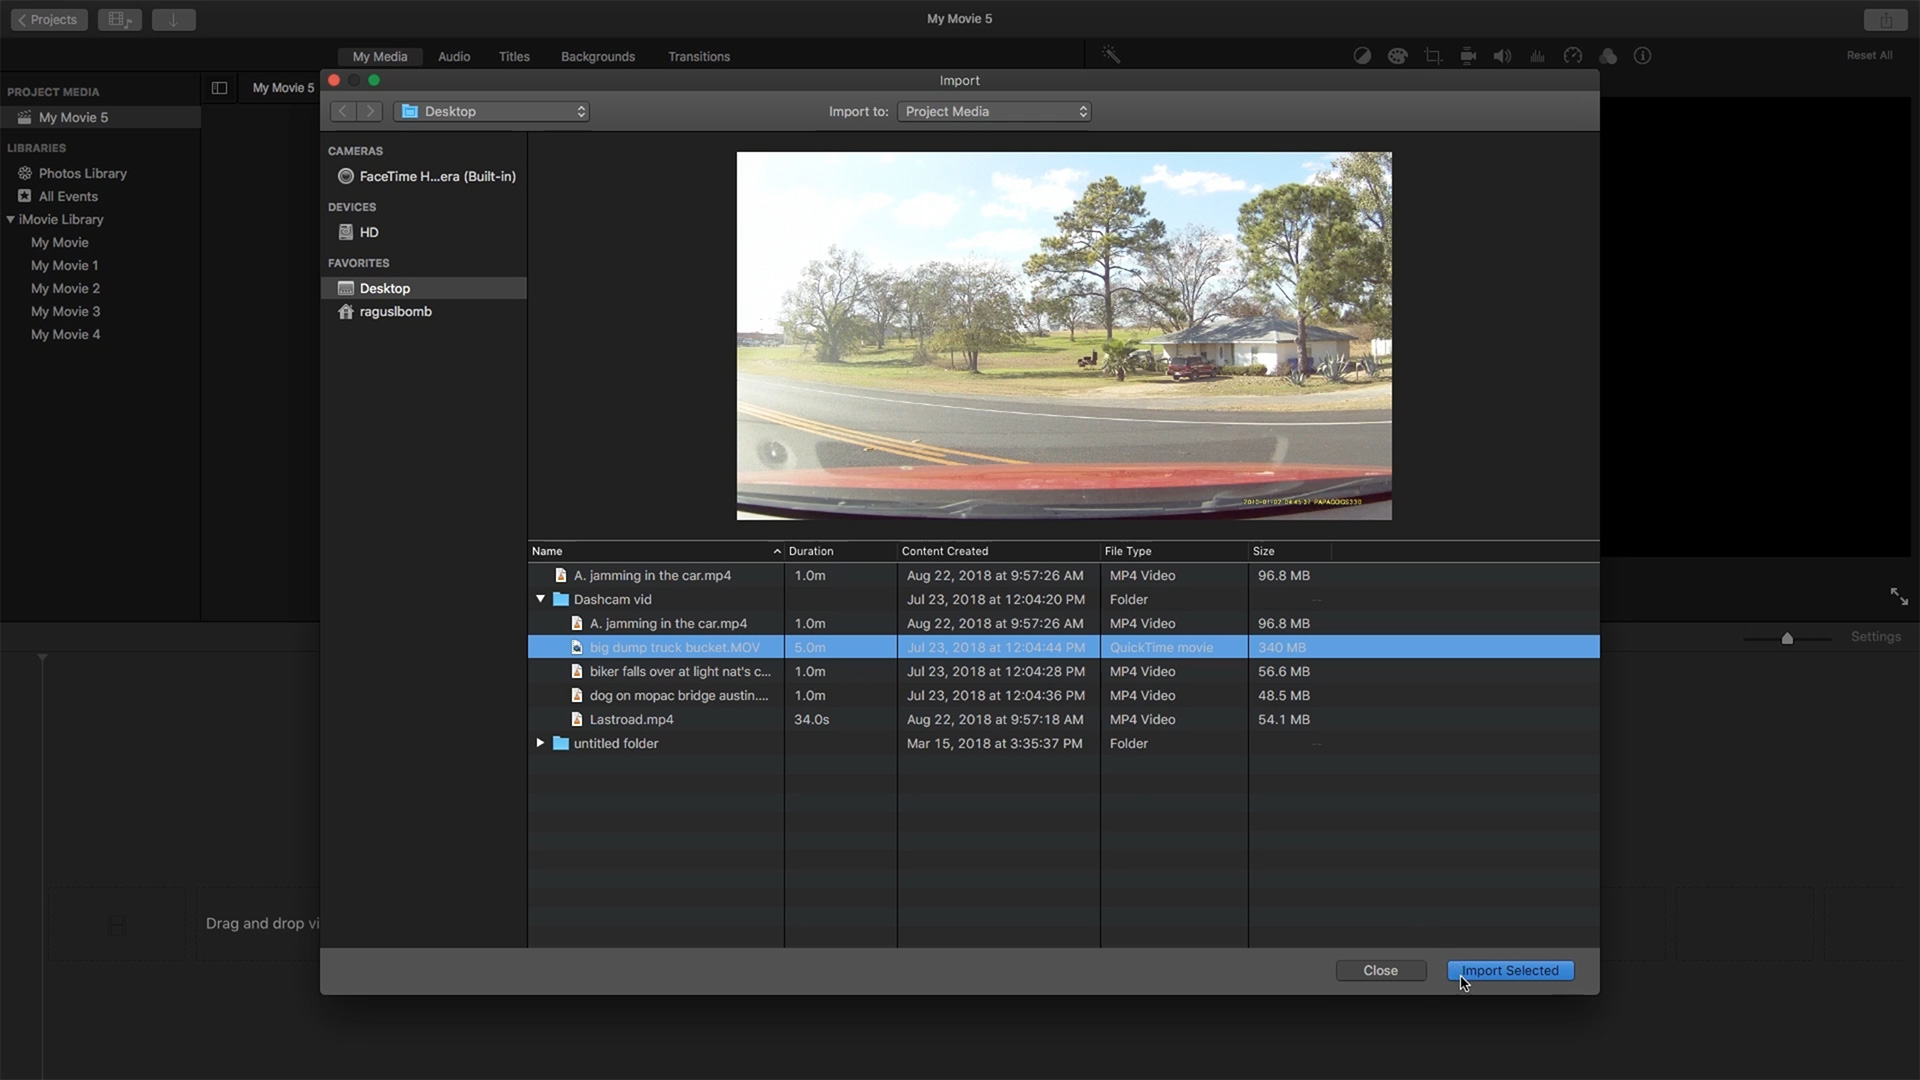
Most dashcams have built in microphones. If you don’t want to share your personal conversations between you and your passengers or maybe you just want to post your dashcam footage to YouTube and avoid possibly getting your video flagged for copyright, this is what you need to do.Before we can remove our audio, we first have to import our footage. Here I’ll import my files by clicking on the "Downward Arrow" labeled "Import Media" in the center of "iMovie".
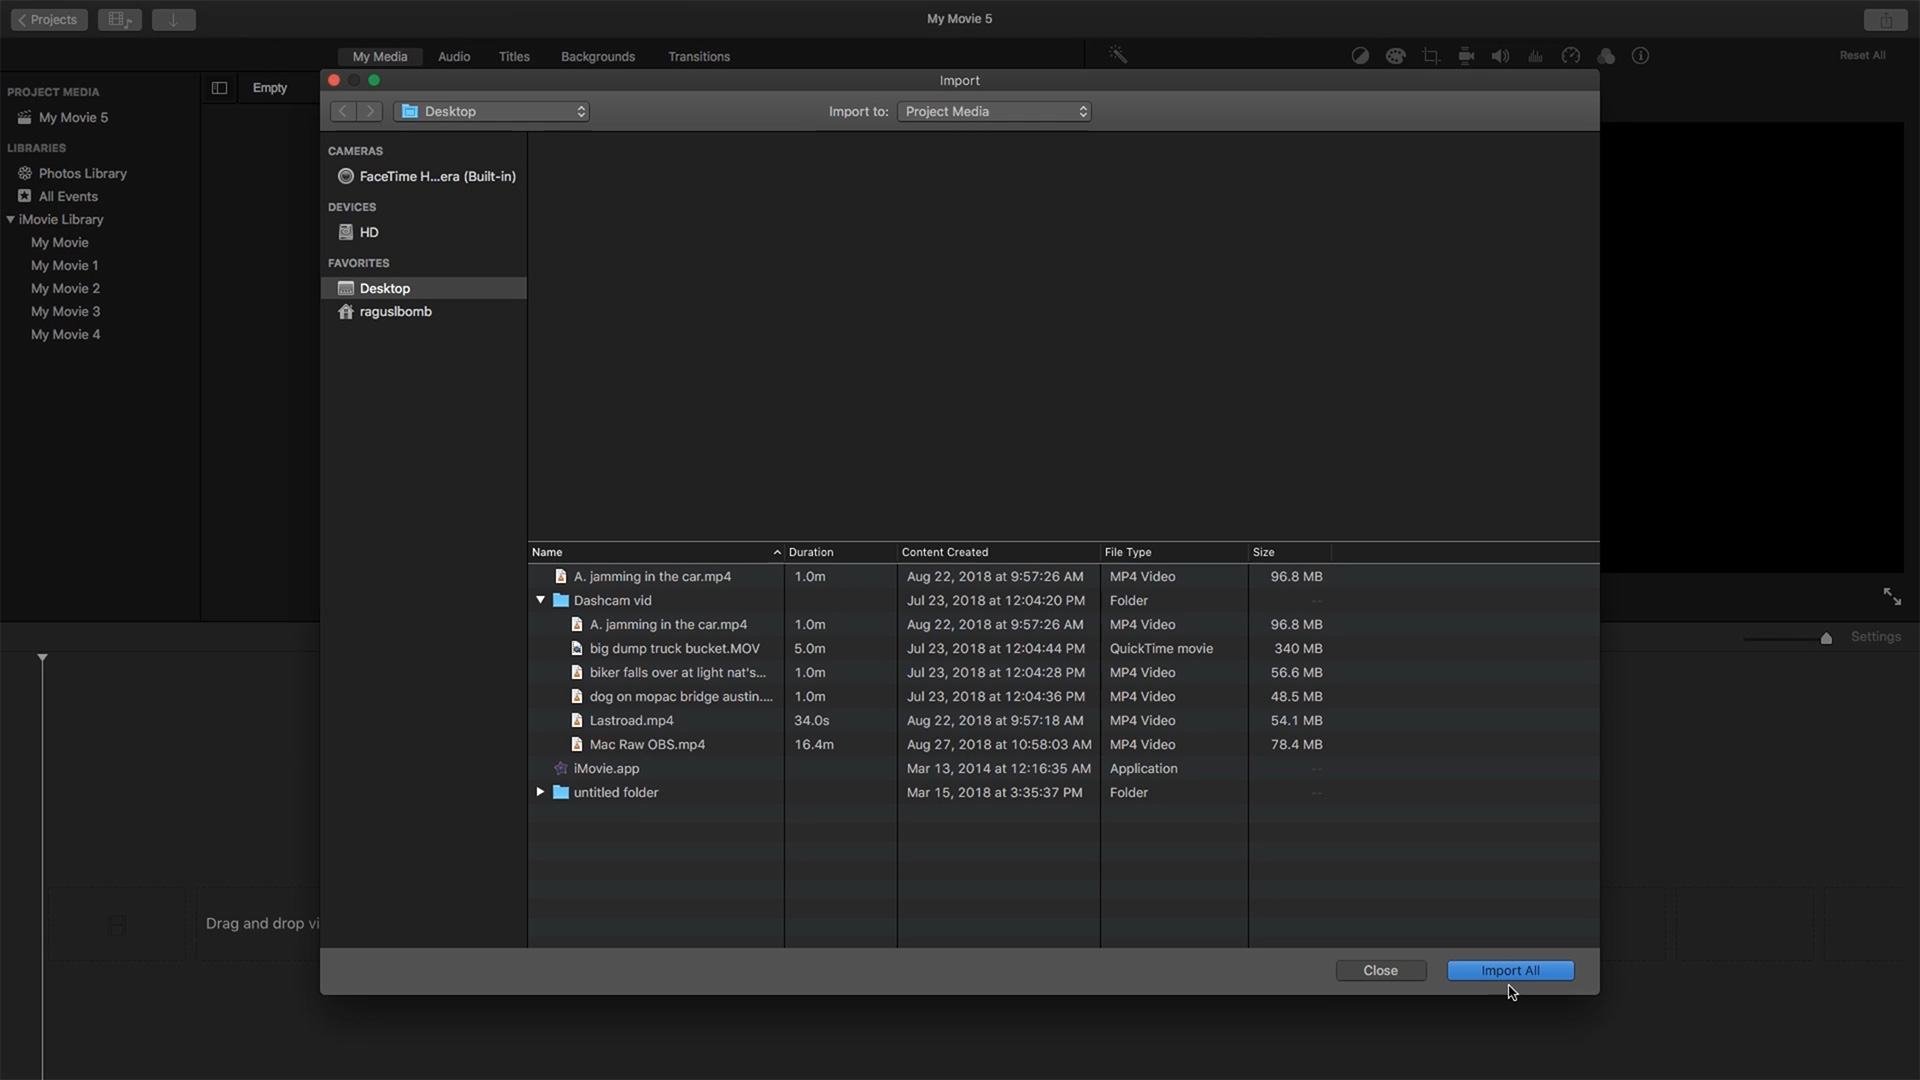
Remember there are multiple ways to import your footage into "iMovie", so you’ll be able to decide amongst the options which works best for you.
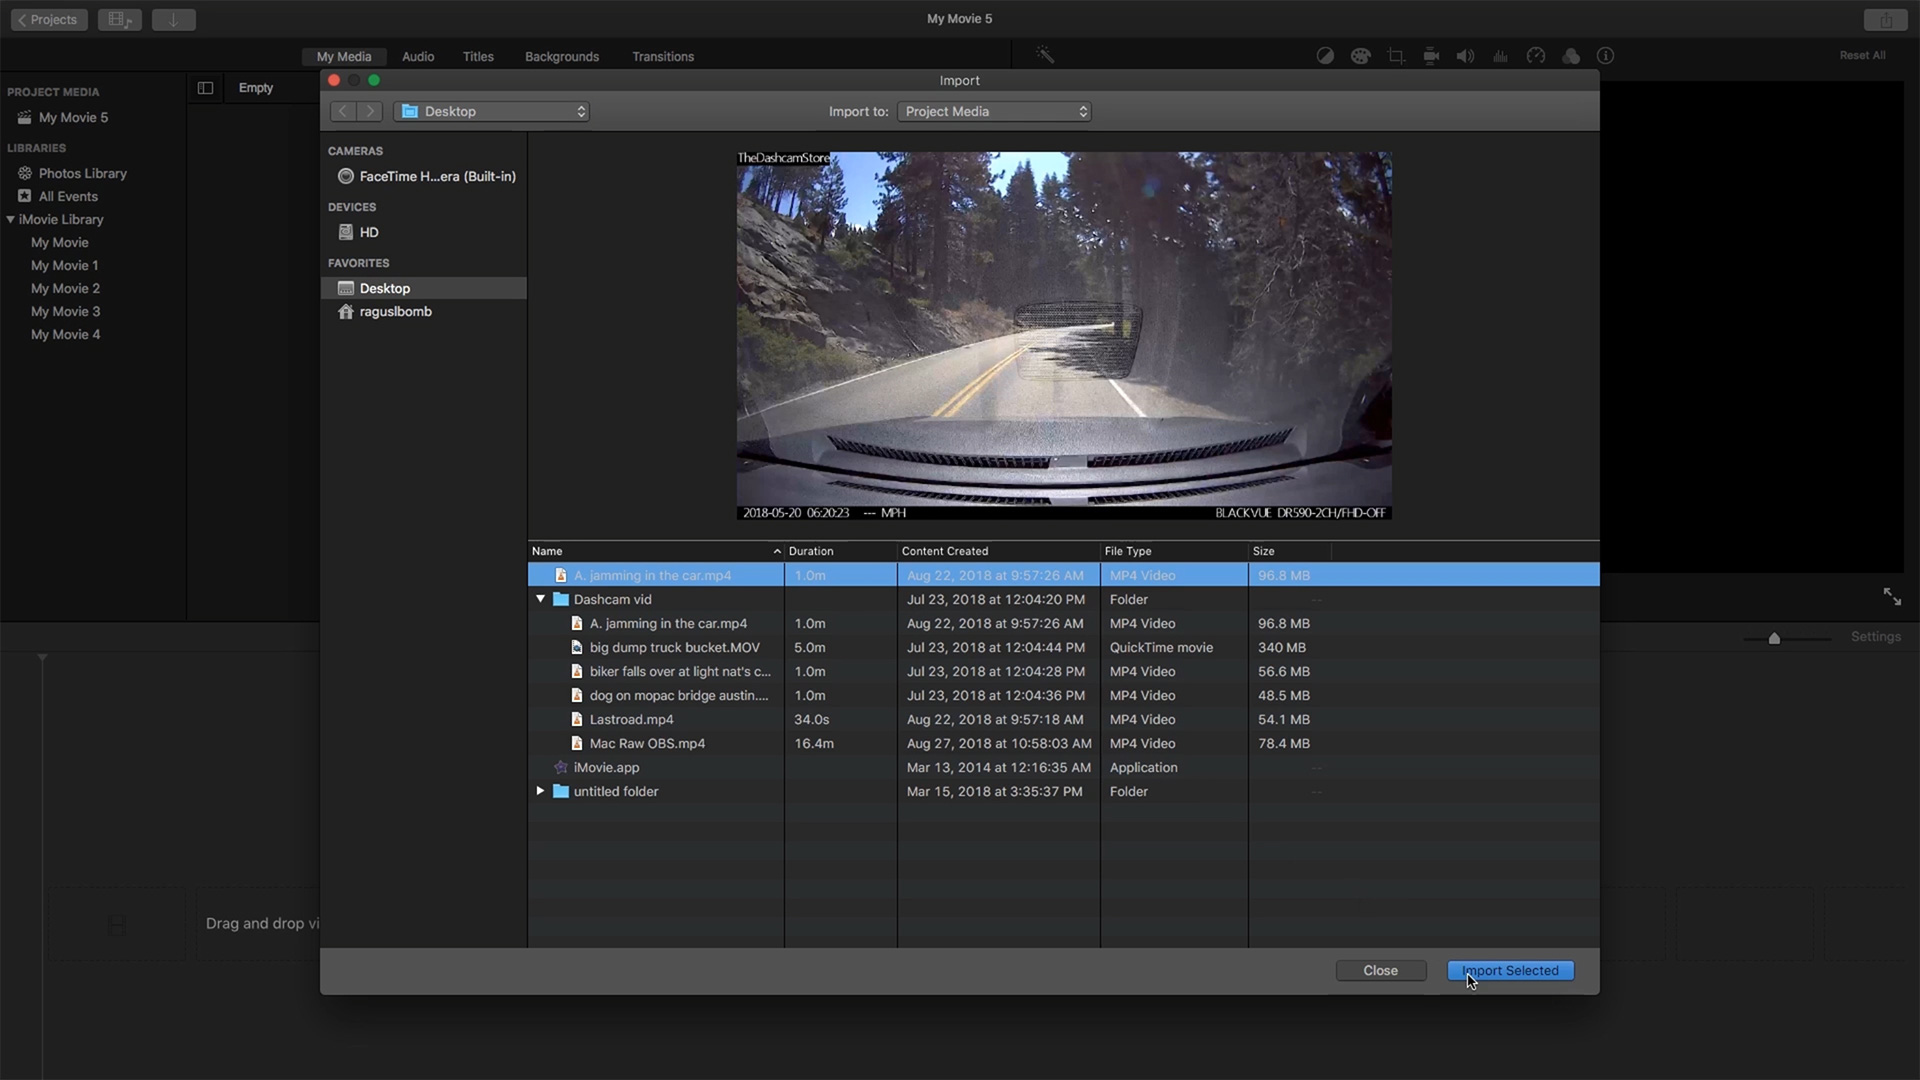
Then select a clip you that you want the audio removed. Then click on "Import Selected" when you’re ready.
If you didn’t import your footage by dragging your files into "iMovie" you’ll have to drag your clip onto
the project timeline before we can begin editing the clip.
![How-to: Edit dashcam footage with a Mac]()

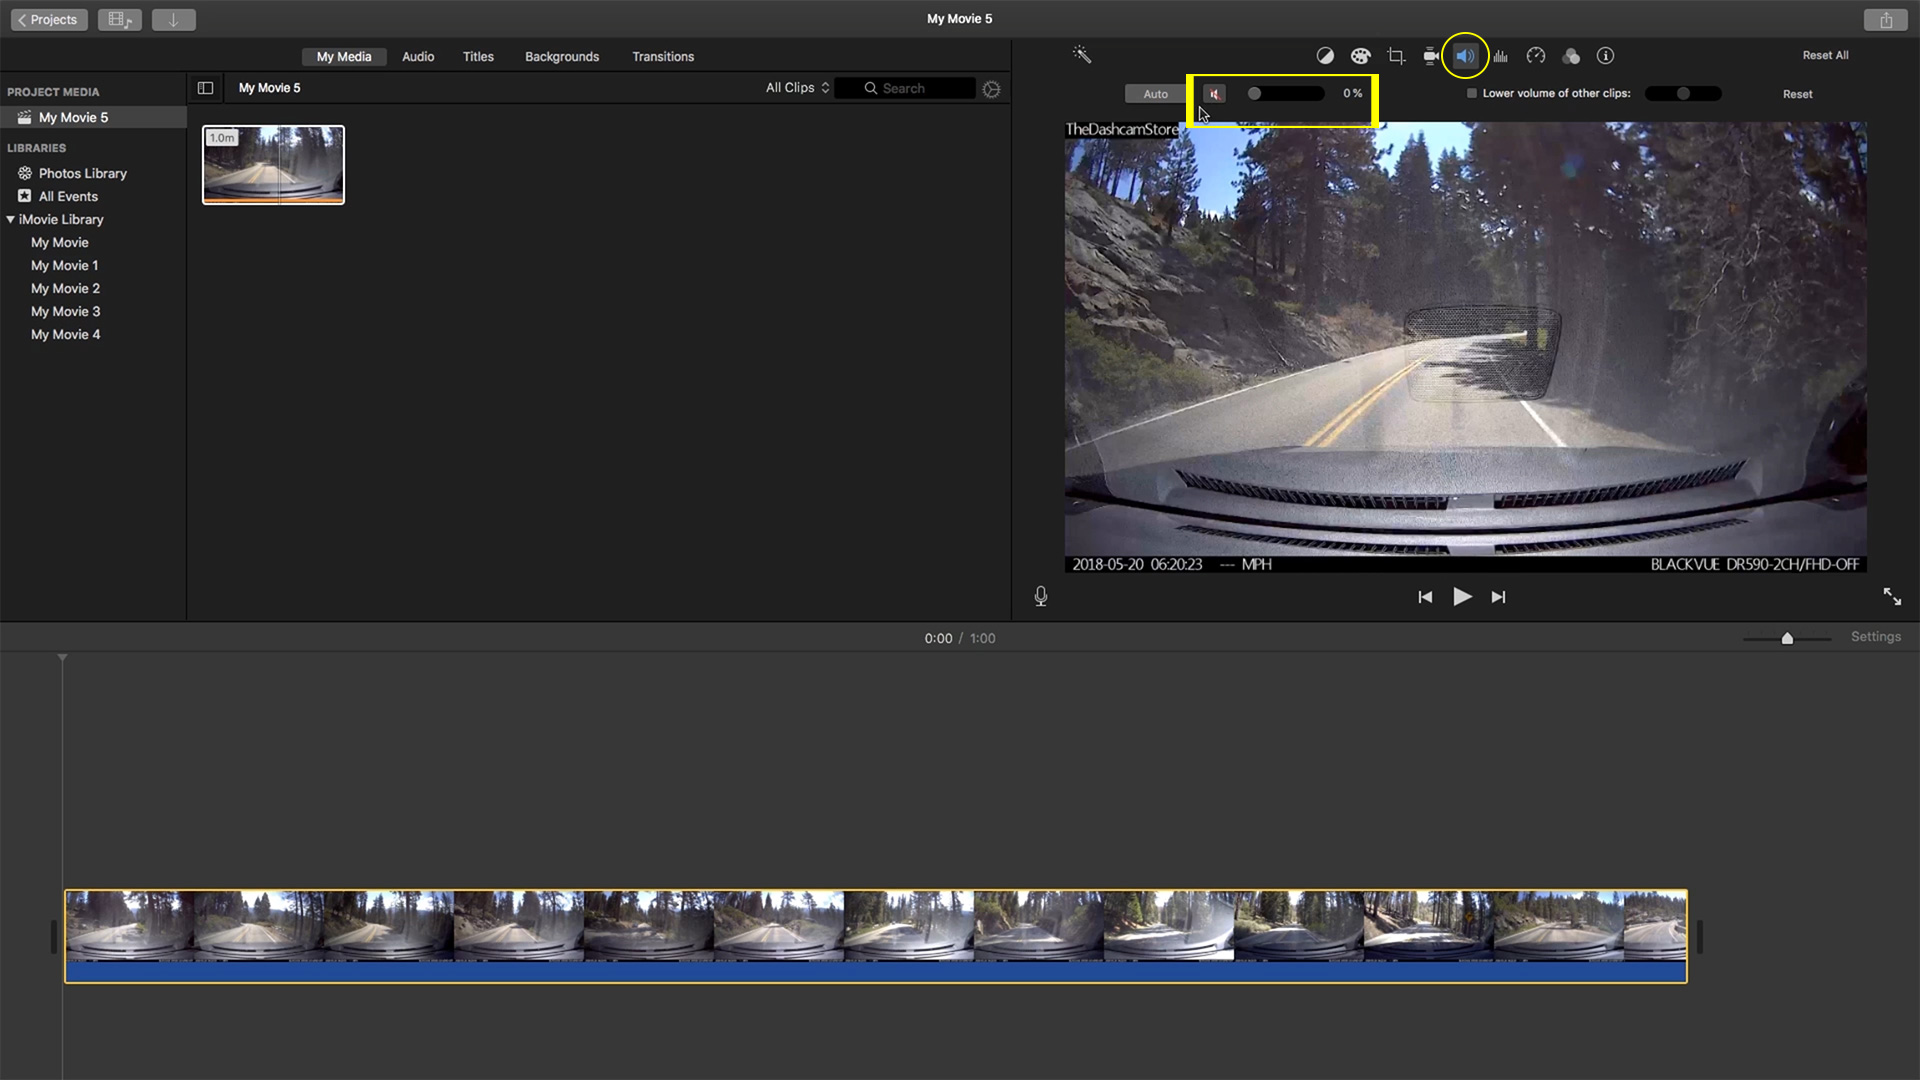
Now let’s remove the audio from our video. Click on the speaker icon located on the right side of the
"iMovie" application to open your video’s audio options.
You can remove audio by clicking on the "Smaller Speaker" icon on the left of the audio options or you can drag the circular marker to 0%.
Audio that has been removed or muted is indicated by a red line displayed diagonally across the smaller speaker icon.
![How-to: Edit dashcam footage with a Mac]()
You can remove audio by clicking on the "Smaller Speaker" icon on the left of the audio options or you can drag the circular marker to 0%.
Audio that has been removed or muted is indicated by a red line displayed diagonally across the smaller speaker icon.
Now that audio is removed let’s begin the process of saving our edited video clip.
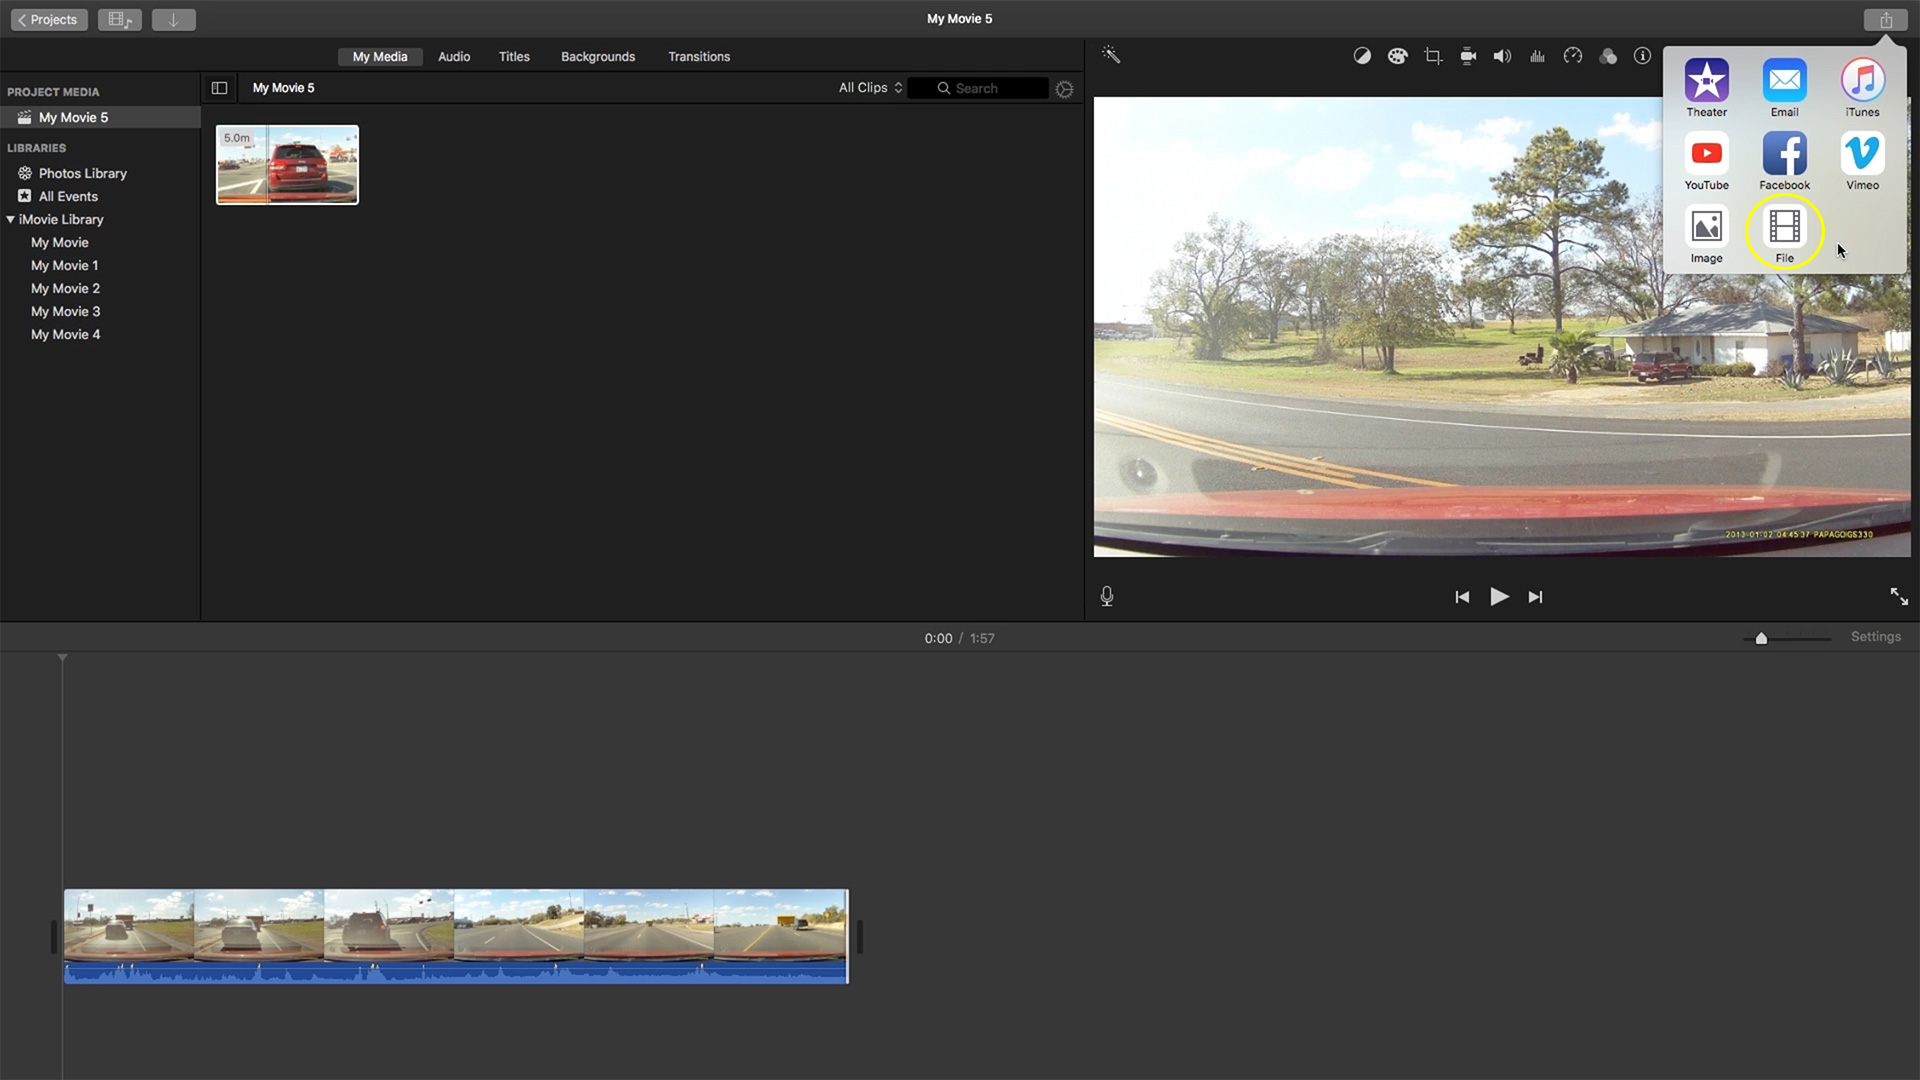
Navigate over to the right-hand corner of the "iMovie" application and click on the share button.
This will open your save options, today we’ll continue by selecting the "File" option to save our footage.
![How-to: Edit dashcam footage with a Mac]()
Navigate over to the right-hand corner of the "iMovie" application and click on the share button.
This will open your save options, today we’ll continue by selecting the "File" option to save our footage.

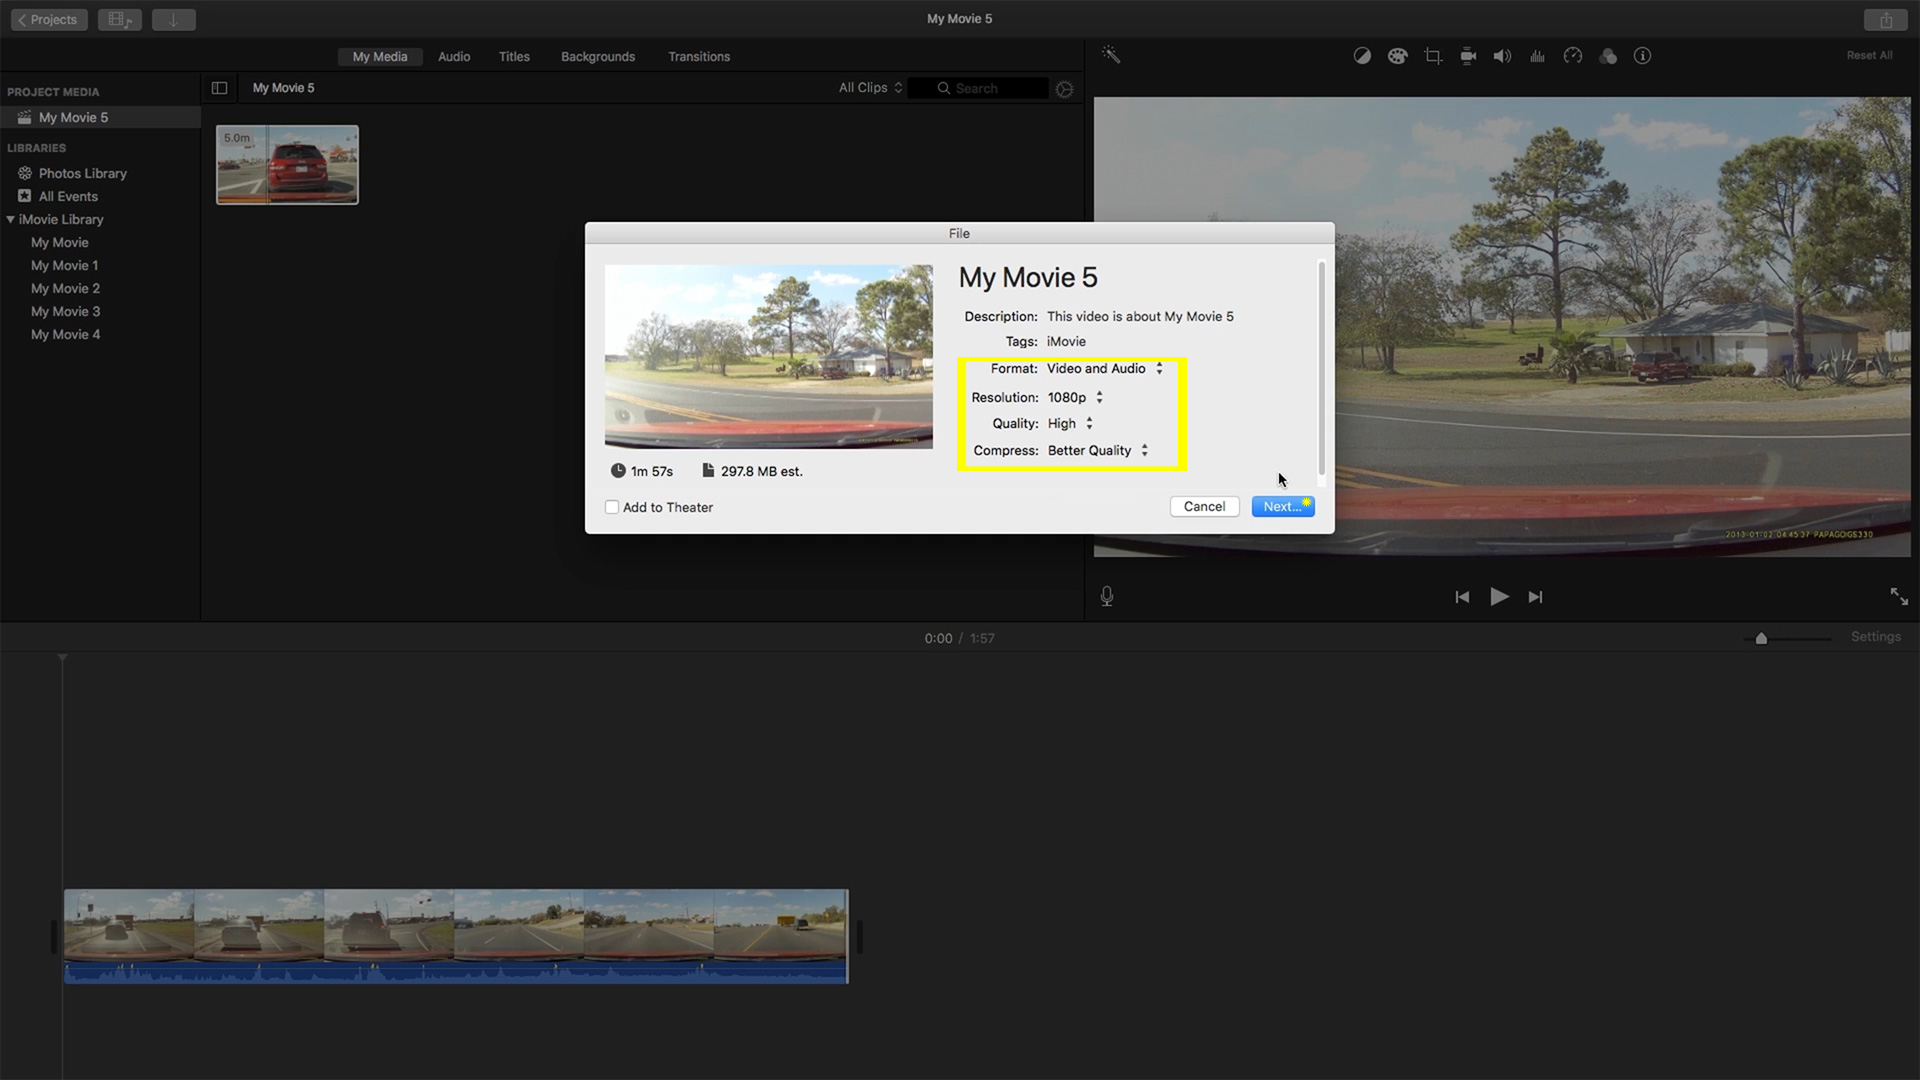
The "File" option allows you to save your video as a local file and it will also allow you to adjust your
file’s video settings such as format, resolution, quality and compression.
![How-to: Edit dashcam footage with a Mac]()
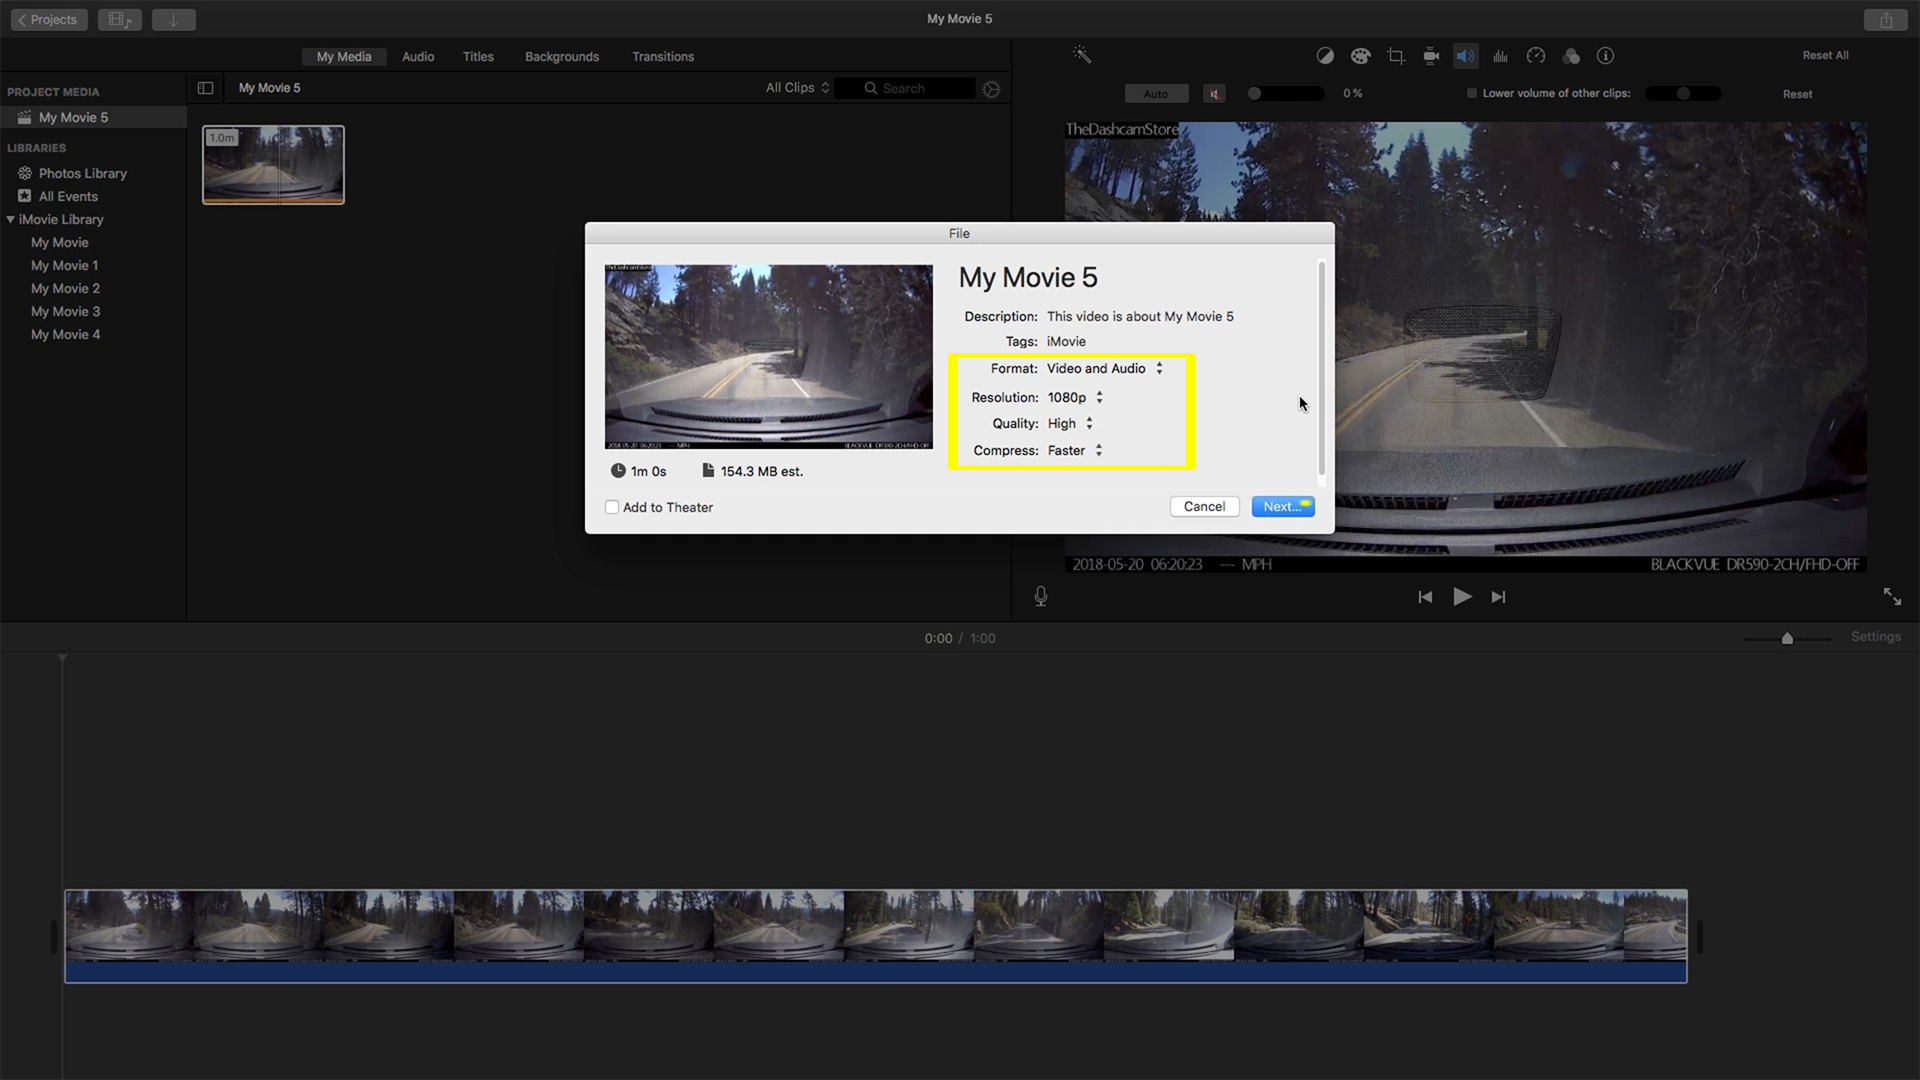
Format – By default allows your video to be saved as "Video & Audio" or if you decide to change
the format, your video can be saved as an "Audio only" file.
Resolution – Will dictate your video’s visual quality. The resolutions 720p & 1080p are considered High Definition, while 540p isn’t. Videos with higher resolution will have a bigger save file because they are retaining more pixel information.
Quality – Dictates both the visual and audio clarity of your finished video. Ranging from low, medium, high, and what "iMovie" states as “best" which is also known as pro res. There’s also a custom option which allows you to manually adjust the megabit information of your video.
And finally, Compression – Think of compression as Blu-ray Vs. DVD. With the "Faster" option being DVD and the "Better Quality" option being Blu-ray.
Then click "Next" when you’re finished adjusting your video options.
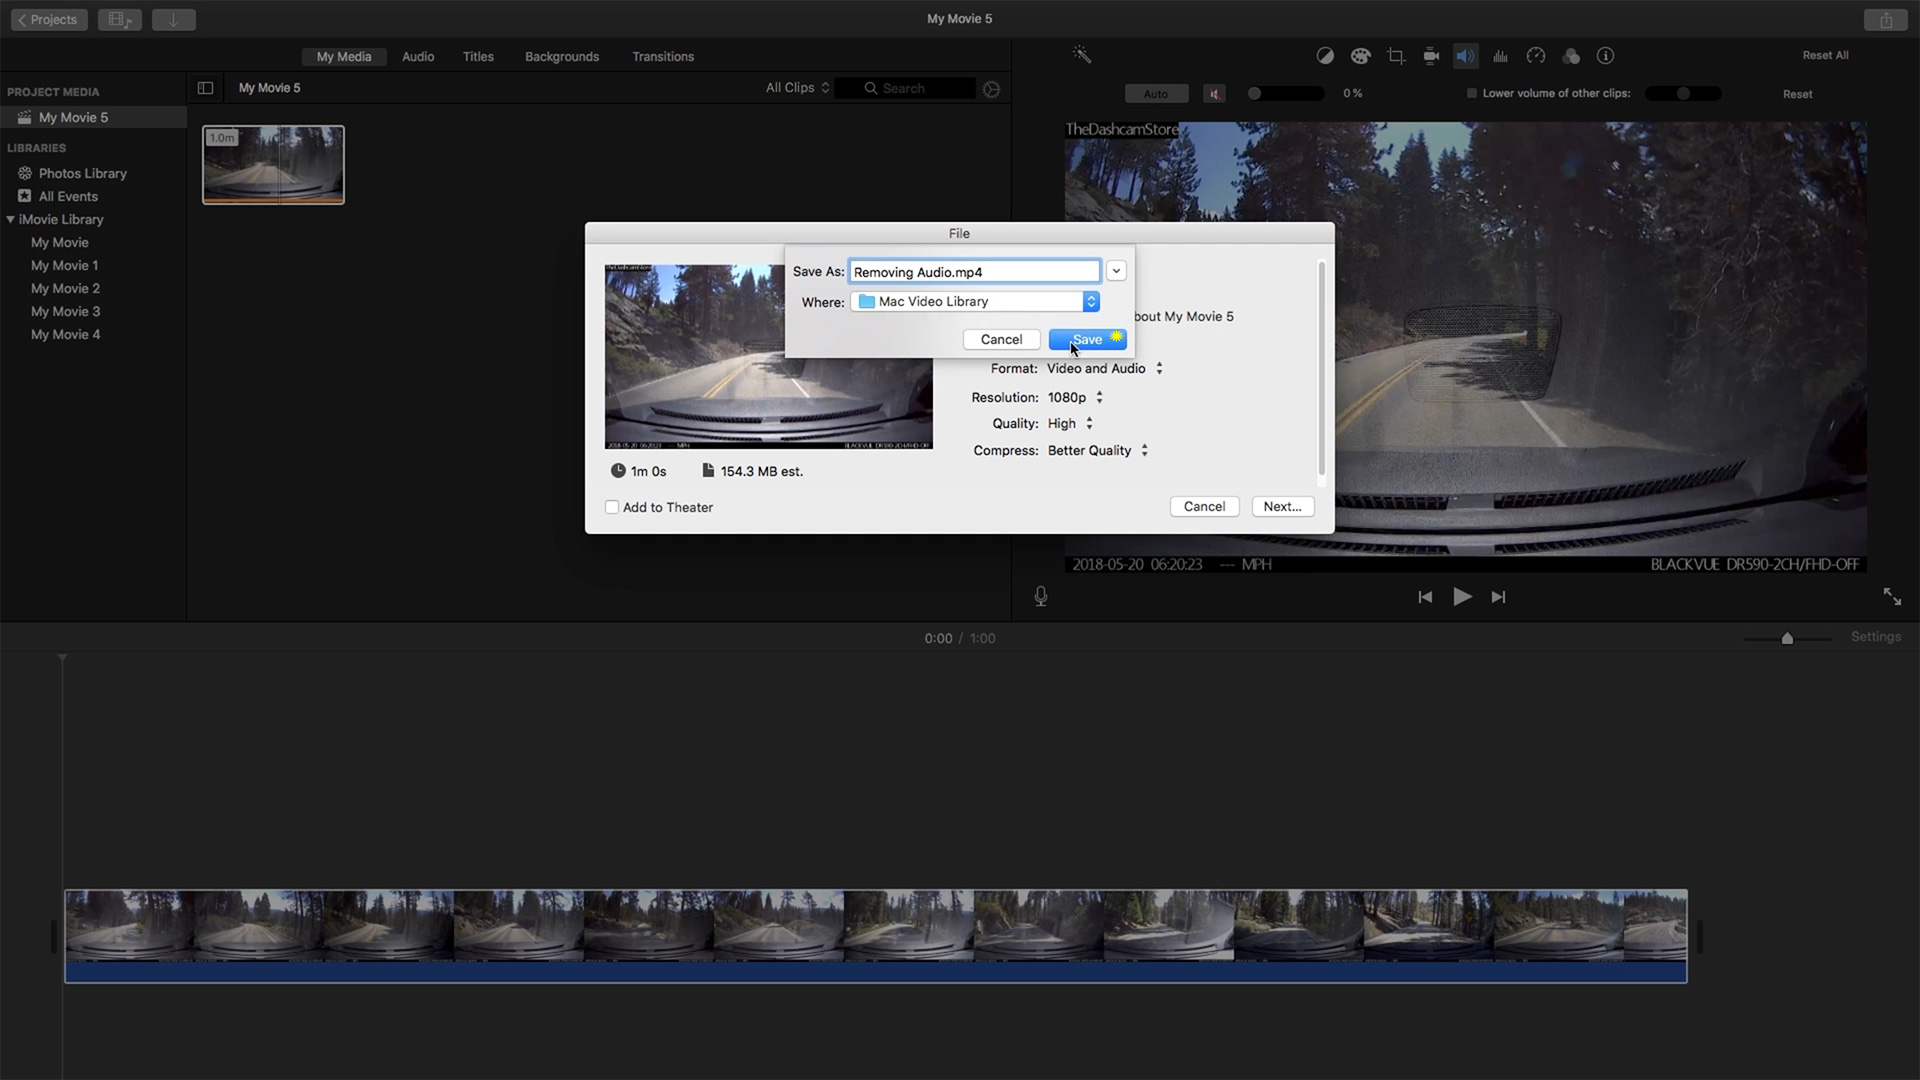
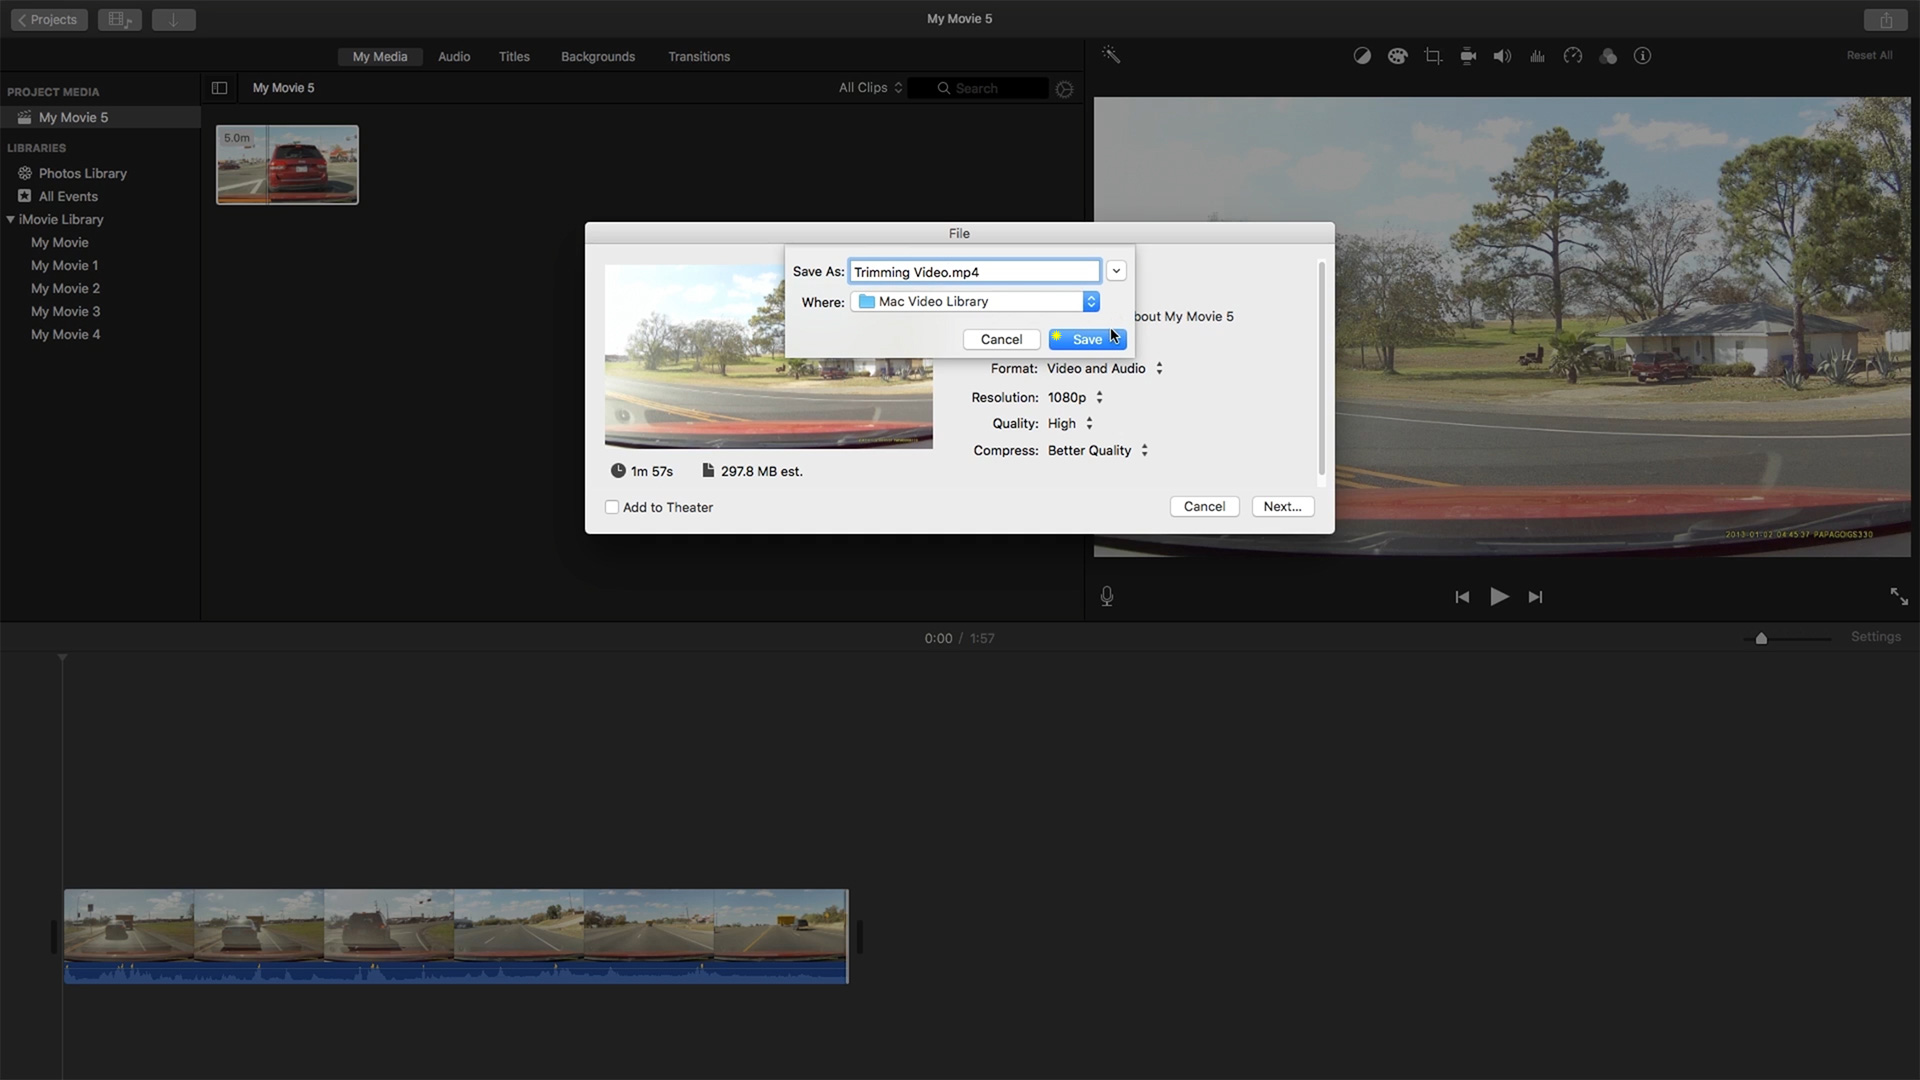
After deciding which options best fit your needs. Let’s name our file and store it in a location that we can easily access. Then click "Save" when you’re done.
![How-to: Edit dashcam footage with a Mac]()
Back to the TopResolution – Will dictate your video’s visual quality. The resolutions 720p & 1080p are considered High Definition, while 540p isn’t. Videos with higher resolution will have a bigger save file because they are retaining more pixel information.
Quality – Dictates both the visual and audio clarity of your finished video. Ranging from low, medium, high, and what "iMovie" states as “best" which is also known as pro res. There’s also a custom option which allows you to manually adjust the megabit information of your video.
And finally, Compression – Think of compression as Blu-ray Vs. DVD. With the "Faster" option being DVD and the "Better Quality" option being Blu-ray.
Then click "Next" when you’re finished adjusting your video options.
After deciding which options best fit your needs. Let’s name our file and store it in a location that we can easily access. Then click "Save" when you’re done.
How To Trim Down Your Dashcam Video Clip
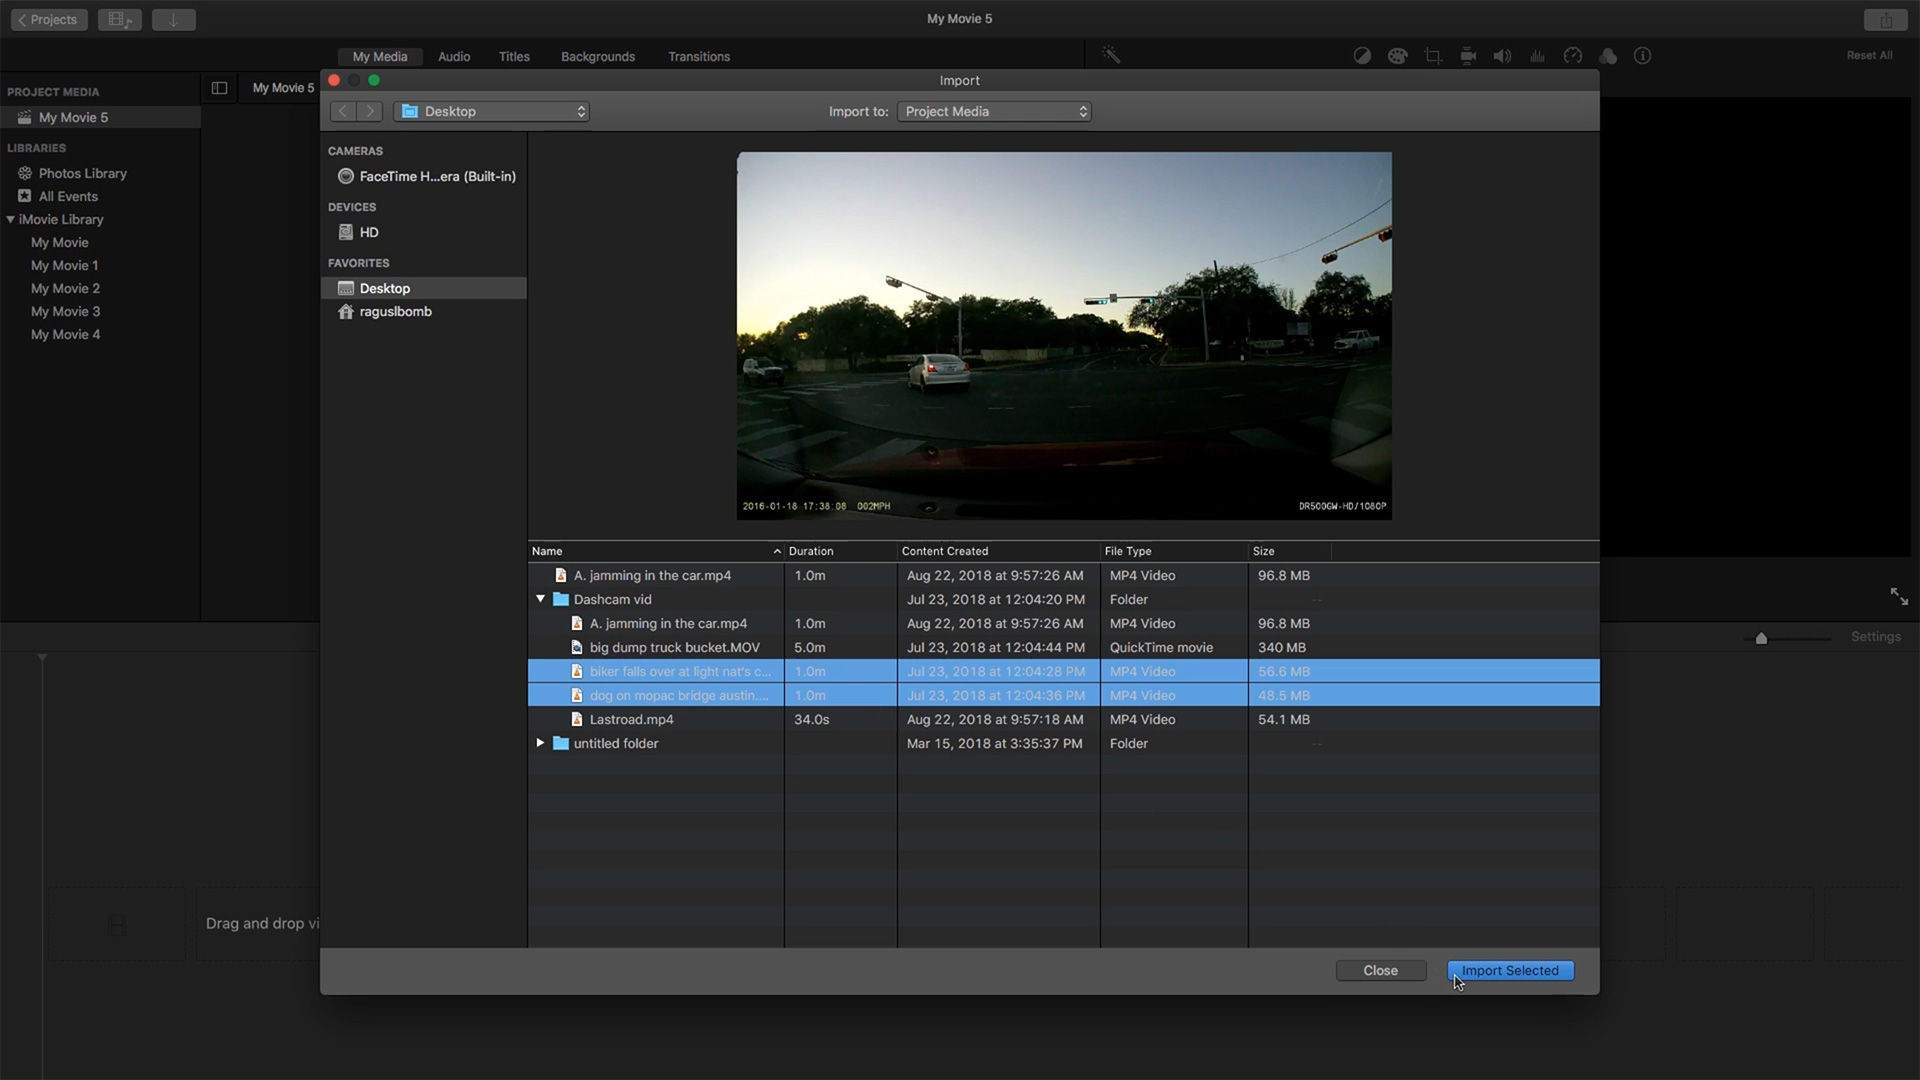
In this portion we’ll trim our footage, removing parts we find undesirable from our video and slimming the duration of our footage.Before we can trim our video footage, we first have to import our footage. Here I’ll import my files by clicking on the "Downward Arrow" labeled "Import Media" in the center of "iMovie".
Remember there are multiple ways to import your footage into "iMovie", so you’ll be able to decide amongst the options which works best for you.
Then select a clip you that you want the trim; then click on "Import Selected" when you are ready.
If you didn’t import your footage by dragging your files into "iMovie" you’ll have to drag your clip onto
the project timeline before we can begin editing the clip.
![How-to: Edit dashcam footage with a Mac]()
On the righthand side of the "iMovie" application you can drag the marker labeled "Settings" to
adjust the scale of your video on the project timeline. This will allow you to expand your clip for finer
editing, as well as allowing you to minimize your clip if it’s too long and clutters your project
timeline.
![How-to: Edit dashcam footage with a Mac]()

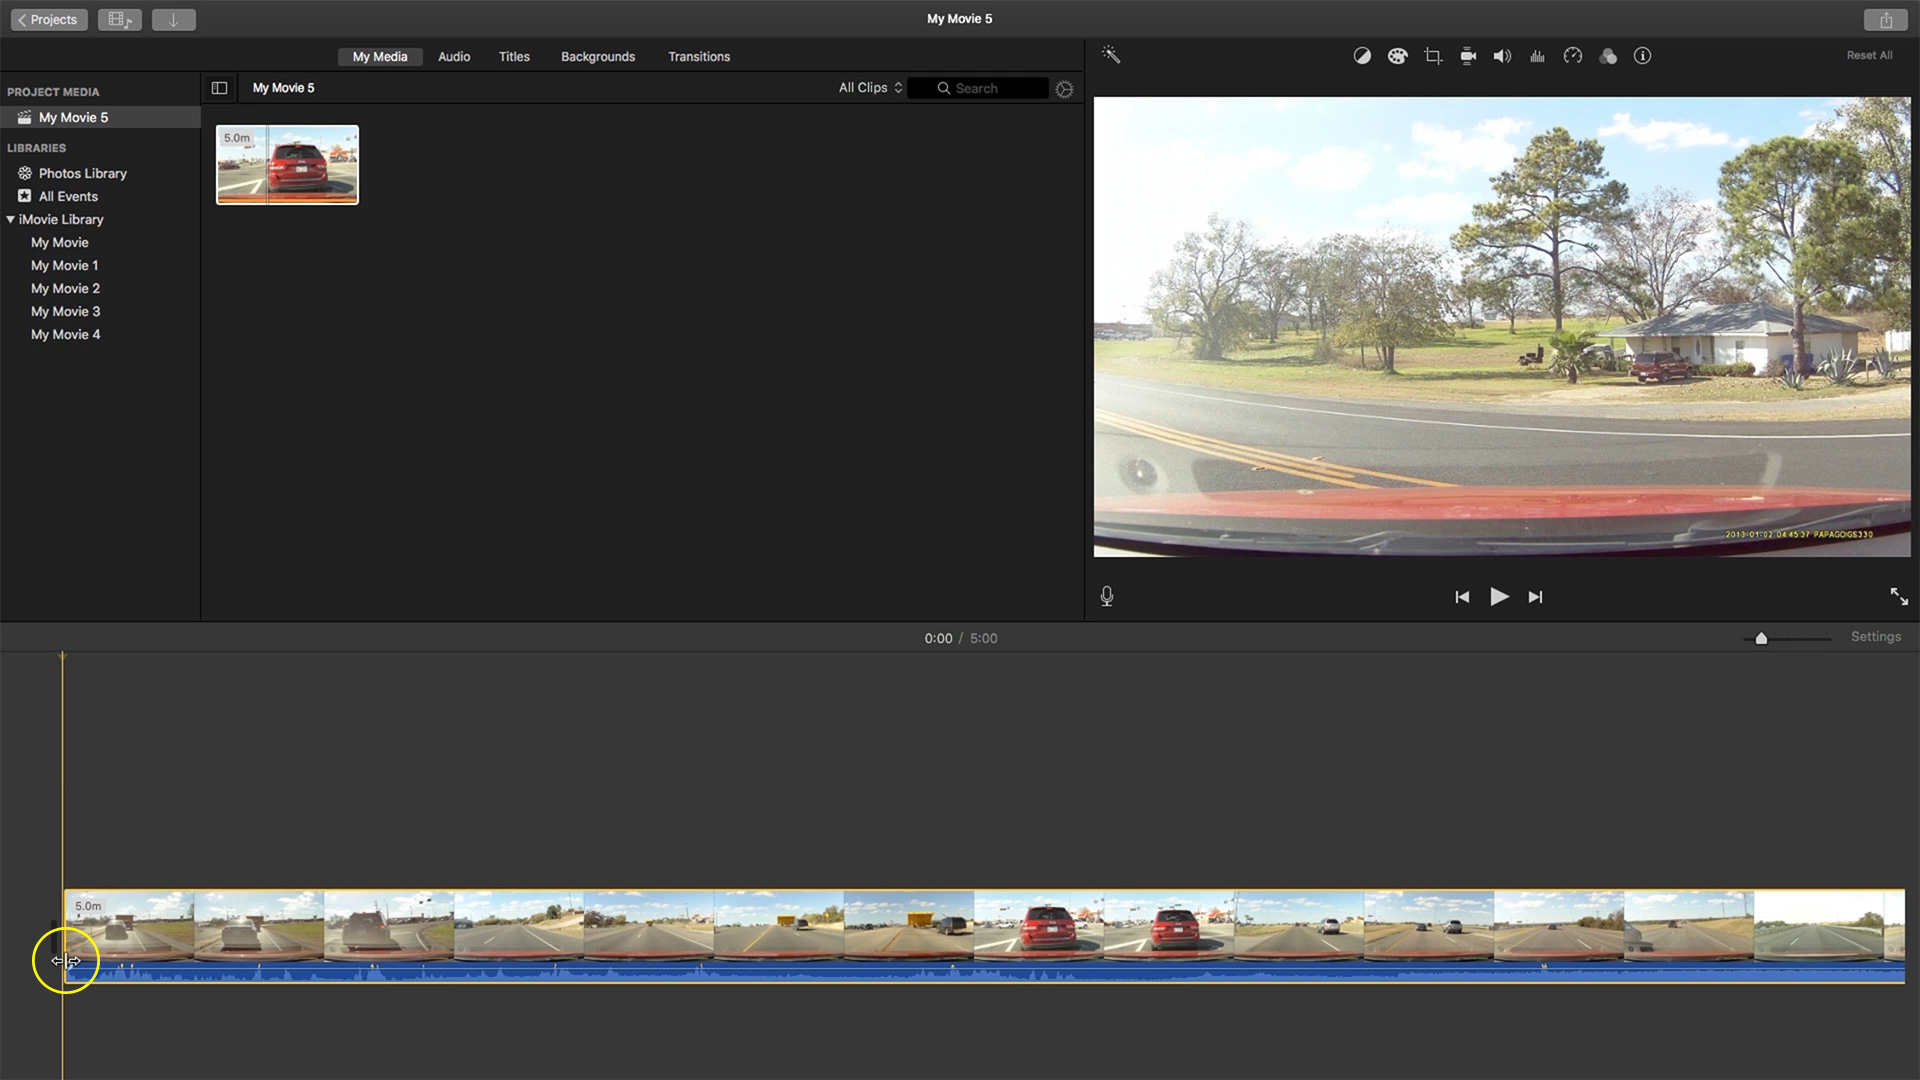
When your workspace is adjusted to your liking, lets trim your video.
First, hover over the beginning or the end of your video clip, this action will transform your cursor into mirrored horizontal arrows.
Then drag left or right to trim the unwanted footage from your video.
![How-to: Edit dashcam footage with a Mac]()
First, hover over the beginning or the end of your video clip, this action will transform your cursor into mirrored horizontal arrows.
Then drag left or right to trim the unwanted footage from your video.
After you’ve trimmed your video to your liking, lets begin the process of saving our video.
Begin by navigating over to the right-hand corner of the "iMovie" application and click on the share button.
This will open your save options, today we’ll continue by selecting the "File" option to save our footage.
![How-to: Edit dashcam footage with a Mac]()
Begin by navigating over to the right-hand corner of the "iMovie" application and click on the share button.
This will open your save options, today we’ll continue by selecting the "File" option to save our footage.
The "File" option allows you to save your video as a local file and it will also allow you to adjust your
file’s video settings such as format, resolution, quality and compression.
![How-to: Edit dashcam footage with a Mac]()
Format – By default allows your video to be saved as "Video & Audio" or if you decide to change
the format, your video can be saved as an "Audio only" file.
Resolution – Will dictate your video’s visual quality. The resolutions 720p & 1080p are considered High Definition, while 540p isn’t. Videos with higher resolution will have a bigger save file because they are retaining more pixel information.
Quality – Dictates both the visual and audio clarity of your finished video. Ranging from low, medium, high, and what "iMovie" states as “best" which is also known as pro res. There’s also a custom option which allows you to manually adjust the megabit information of your video.
And finally, Compression – Think of compression as Blu-ray Vs. DVD. With the "Faster" option being DVD and the "Better Quality" option being Blu-ray.
Then click "Next" when you’re finished adjusting your video options.
After deciding which options best fit your needs. Let’s name our file and store it in a location that we can easily access. Then click "Save" when you’re done.
![How-to: Edit dashcam footage with a Mac]()
Back to the TopResolution – Will dictate your video’s visual quality. The resolutions 720p & 1080p are considered High Definition, while 540p isn’t. Videos with higher resolution will have a bigger save file because they are retaining more pixel information.
Quality – Dictates both the visual and audio clarity of your finished video. Ranging from low, medium, high, and what "iMovie" states as “best" which is also known as pro res. There’s also a custom option which allows you to manually adjust the megabit information of your video.
And finally, Compression – Think of compression as Blu-ray Vs. DVD. With the "Faster" option being DVD and the "Better Quality" option being Blu-ray.
Then click "Next" when you’re finished adjusting your video options.
After deciding which options best fit your needs. Let’s name our file and store it in a location that we can easily access. Then click "Save" when you’re done.
How To Combine Dashcam Video Clips Into One Video
Here, we’ll go over how to merge separate video clips into a single file.Before we can merge our video footage, we first have to import our footage. Here I’ll import my files by clicking on the "Downward Arrow" labeled "Import Media" in the center of "iMovie".
Remember there are multiple ways to import your footage into "iMovie", so you’ll be able to decide amongst the options which works best for you.
Here, I’ll hold down the "Command" key on my keyboard to import two video clips.
If you didn’t import your footage by dragging your files into "iMovie" you’ll have to drag your clips
onto the project timeline before we can begin editing the clips.
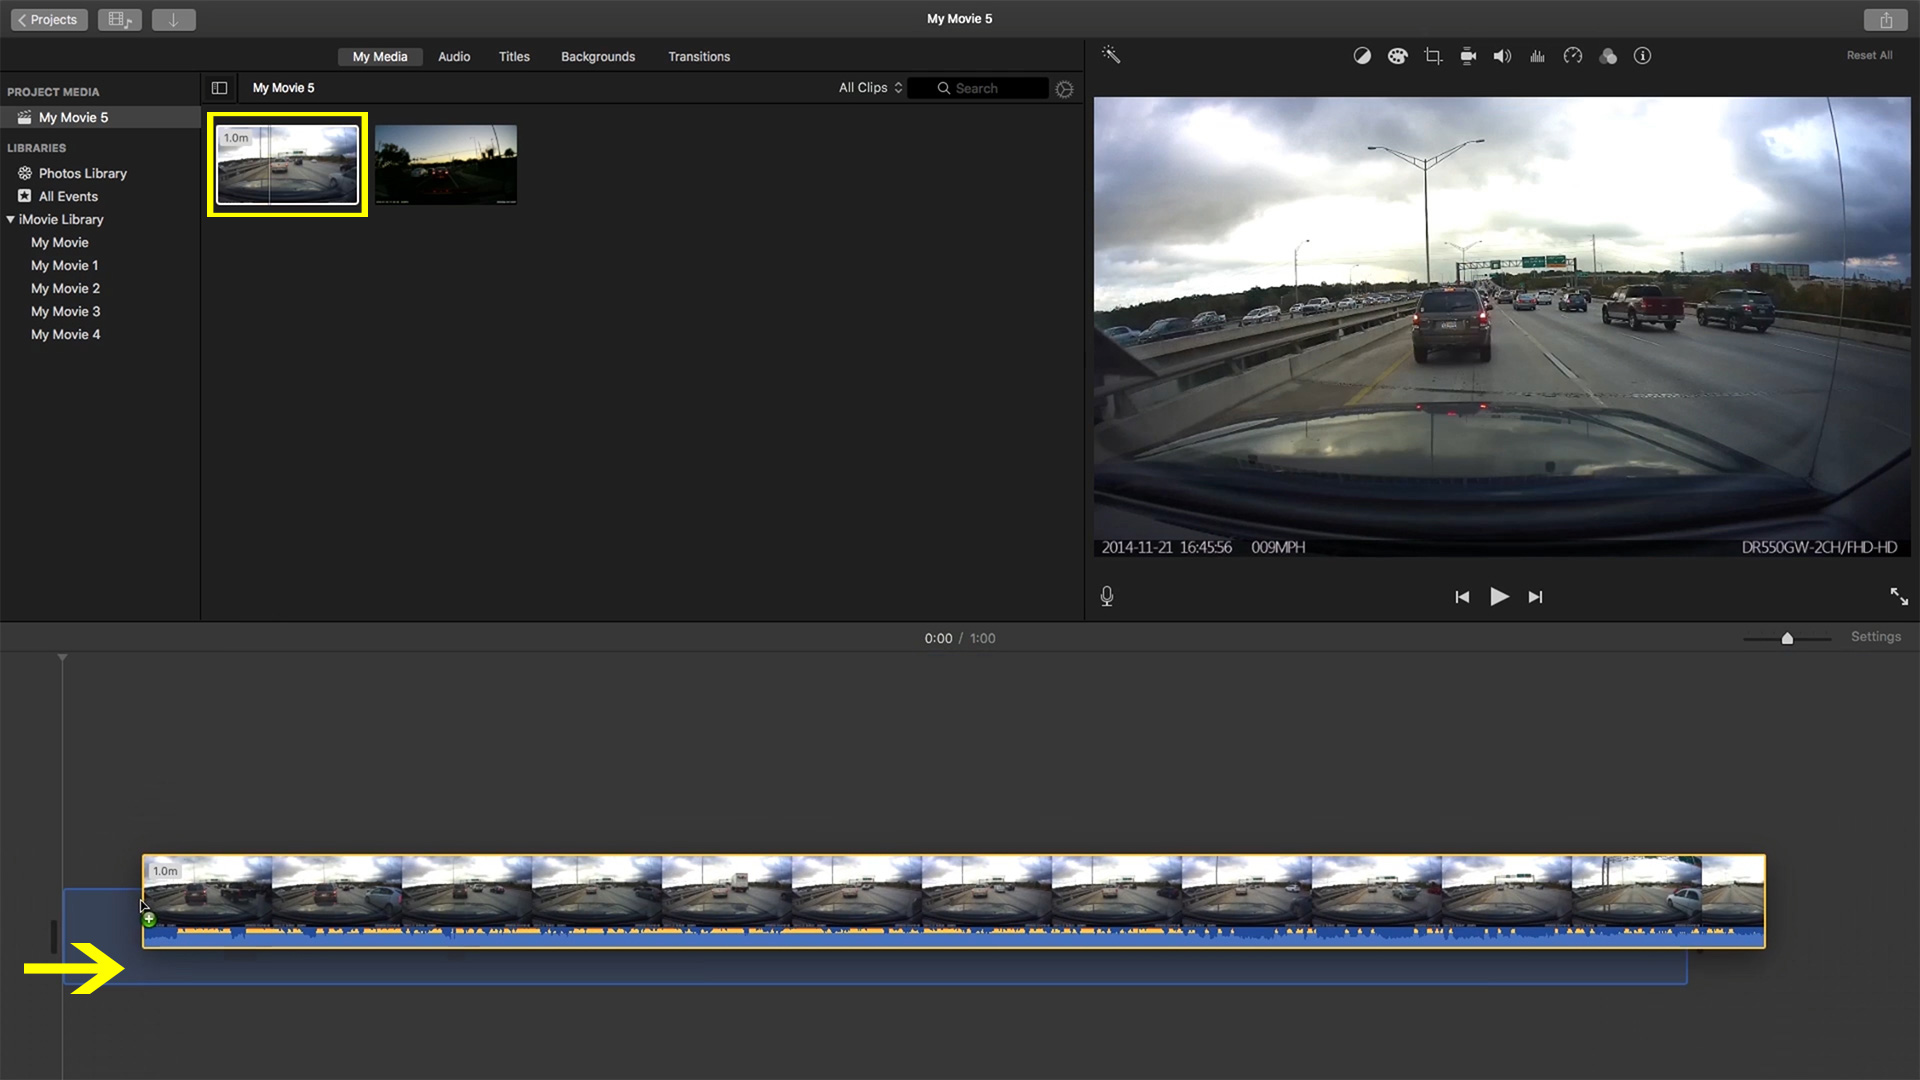
Here I’ll drag my first clip onto the project timeline.
![How-to: Edit dashcam footage with a Mac]() Then I’ll drag my second clip onto the timeline as well.
Then I’ll drag my second clip onto the timeline as well.
![How-to: Edit dashcam footage with a Mac]()
Here I’ll drag my first clip onto the project timeline.
 Then I’ll drag my second clip onto the timeline as well.
Now that there are two videos on my project timeline, I’ll need to declutter my workspace so I can easier
maintain my videos.
Just like earlier, on the righthand side of the "iMovie" application you can drag the marker labeled "Settings" to adjust the scale of your video on the project timeline.
When your workspace is adjusted to your liking, in the top left-hand corner of the "iMovie" application click on the small "Downward Arrow" icon to import another clip.
![How-to: Edit dashcam footage with a Mac]()
Just like earlier, on the righthand side of the "iMovie" application you can drag the marker labeled "Settings" to adjust the scale of your video on the project timeline.
When your workspace is adjusted to your liking, in the top left-hand corner of the "iMovie" application click on the small "Downward Arrow" icon to import another clip.

Then select another clip you want to combine with the two clips already on the project timeline.
Then click on "Import Selected" when you’re ready.
![How-to: Edit dashcam footage with a Mac]()
Then click on "Import Selected" when you’re ready.

Just like before, if you didn’t choose to import your files by dragging your clips into "iMovie" you’ll
have to drag the newly imported clip onto the project timeline.
![How-to: Edit dashcam footage with a Mac]()
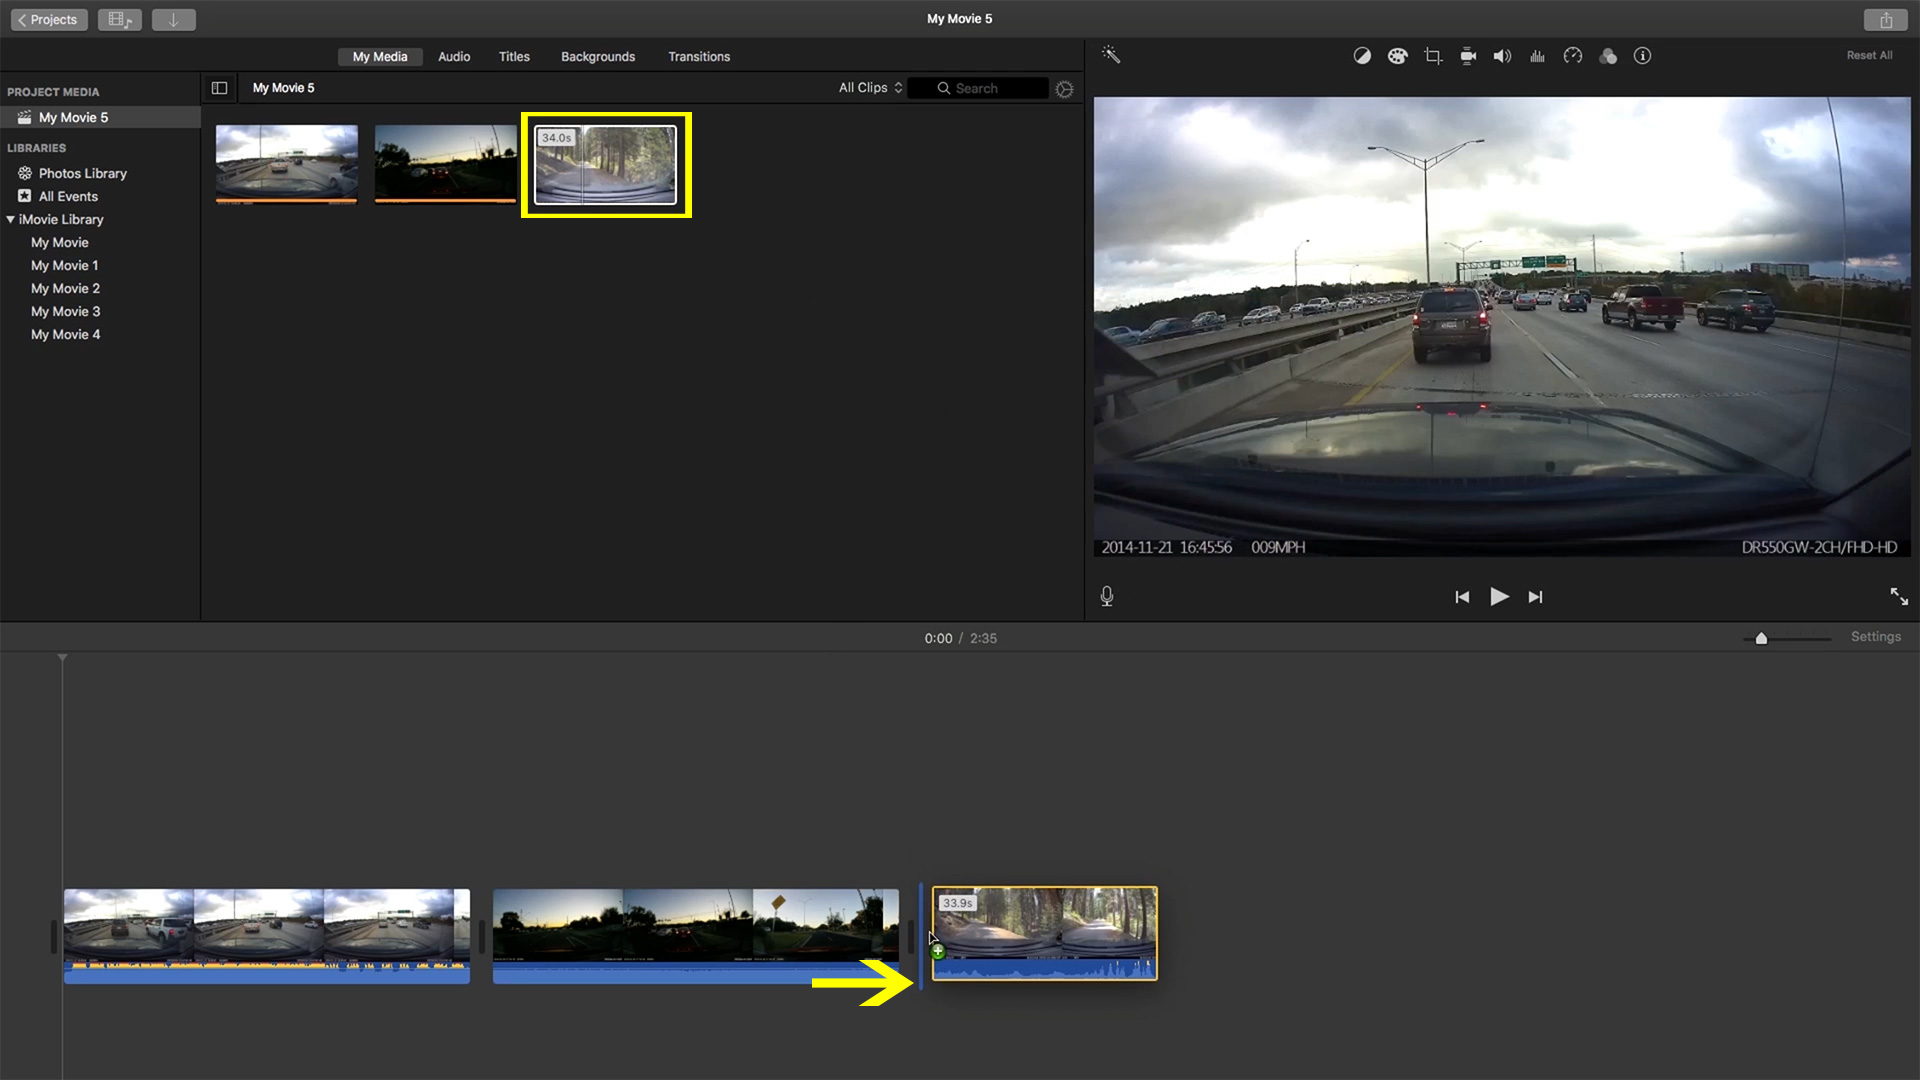
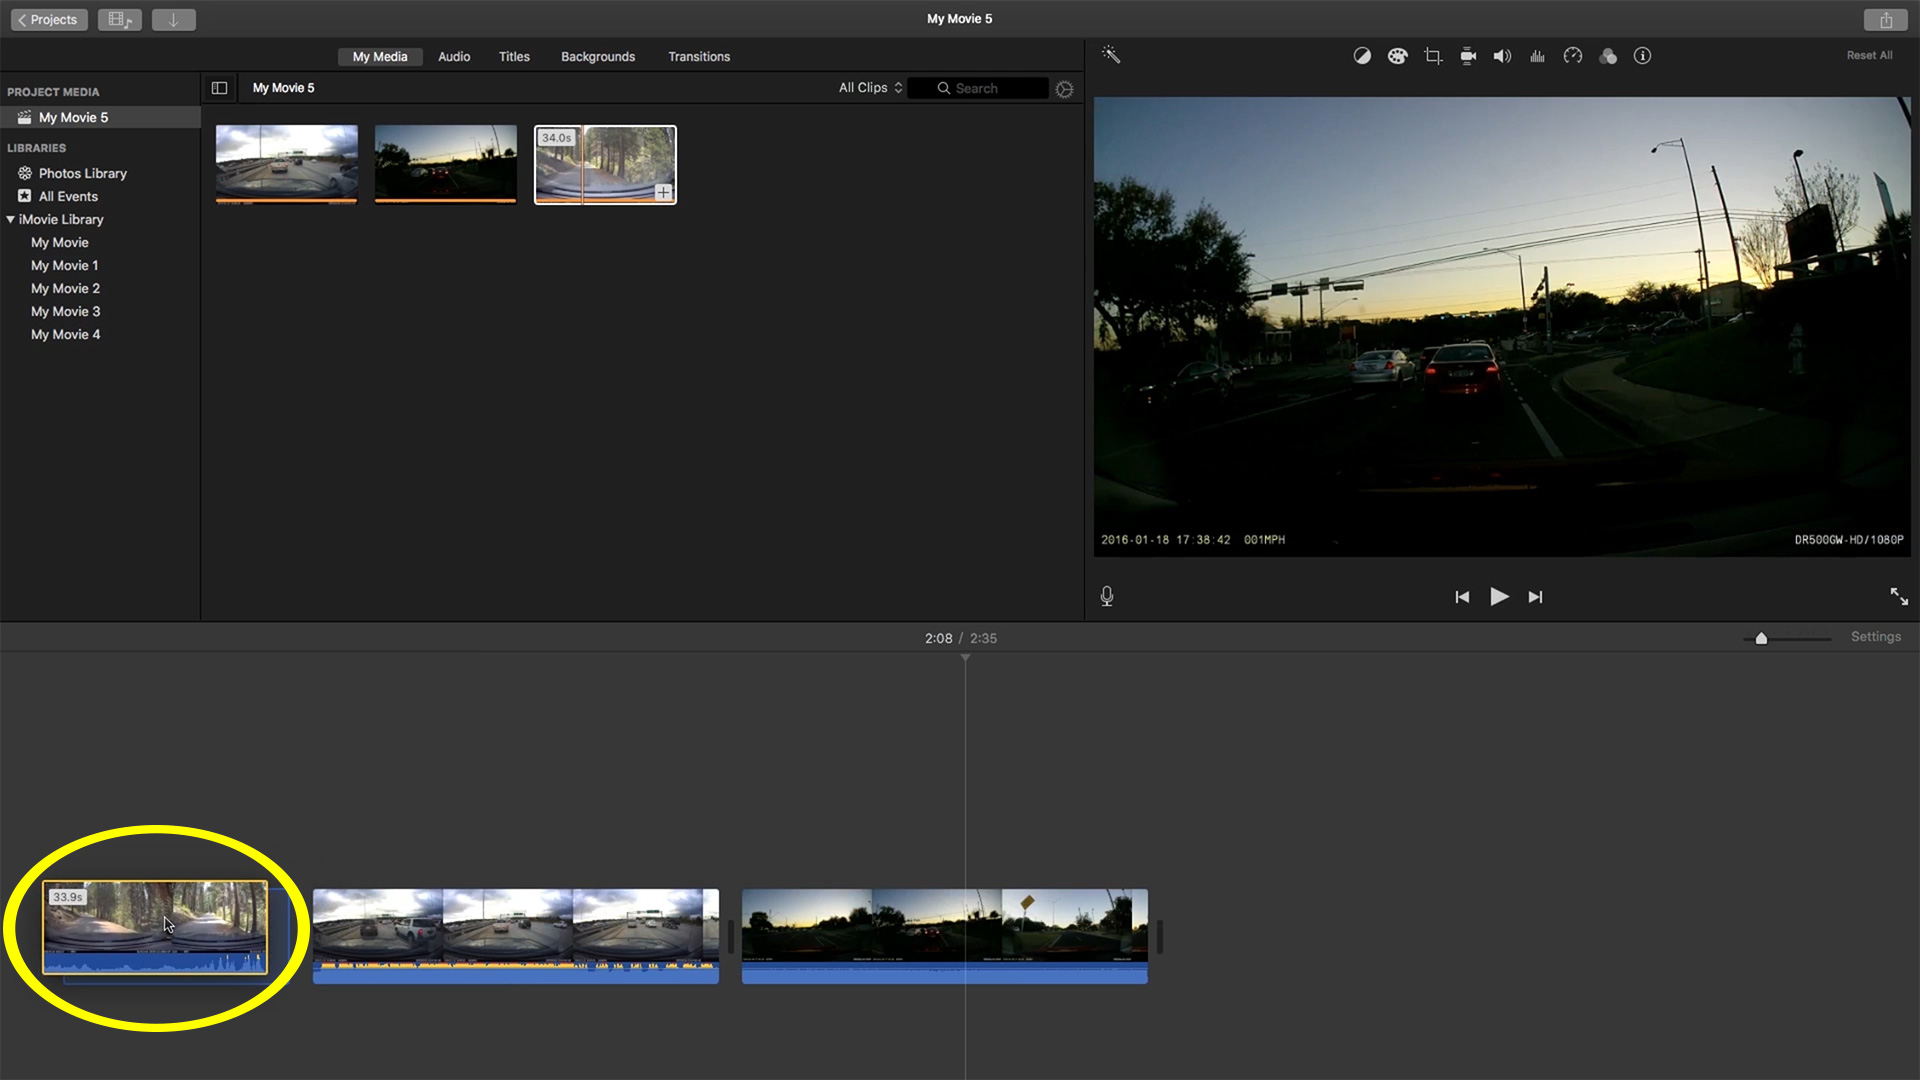
Now that our clips are merged on the same timeline, we can rearrange their order to our liking.
You can click on a clip and drag it in front or behind another clip to rearrange its position.
Here I’m moving my final clip to the front of my project timeline.
![How-to: Edit dashcam footage with a Mac]()
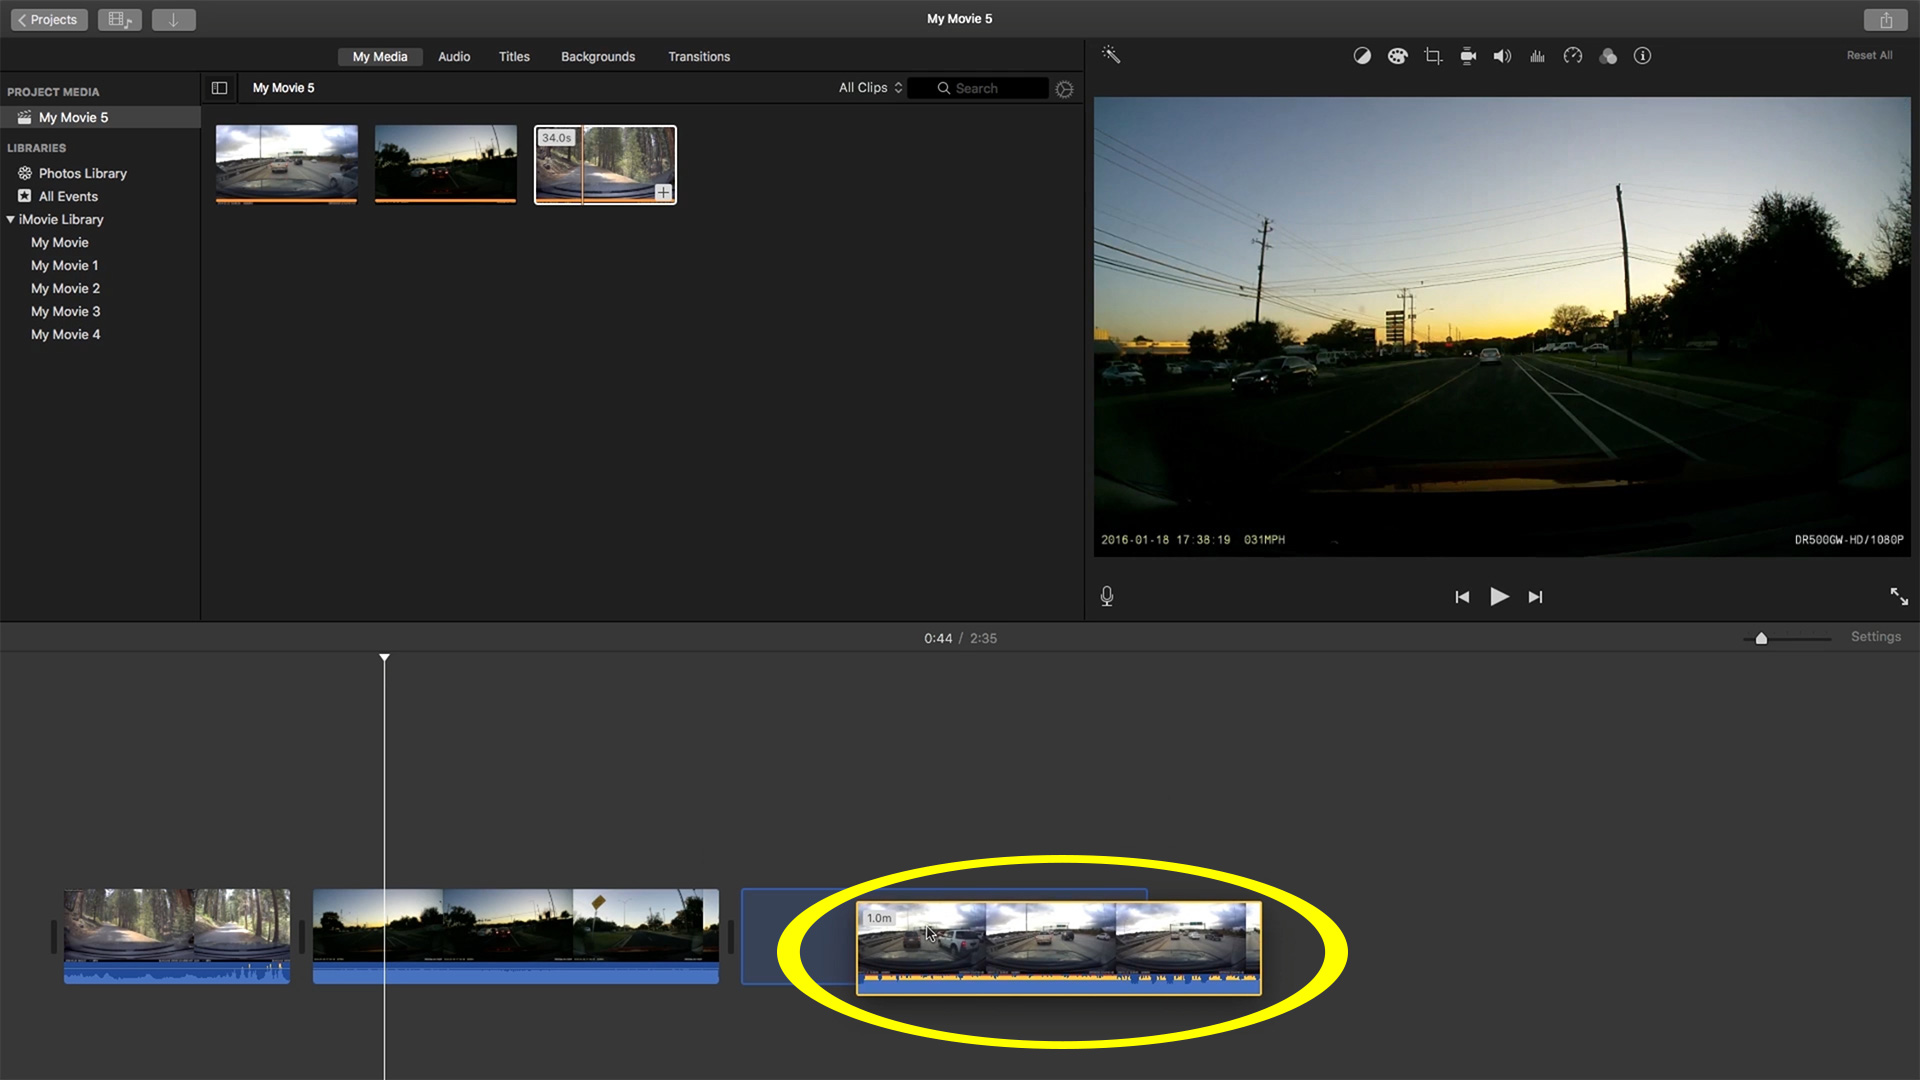
In this slide, I’m moving my middle clip to the end of my project timeline.
![How-to: Edit dashcam footage with a Mac]()
You can click on a clip and drag it in front or behind another clip to rearrange its position.
Here I’m moving my final clip to the front of my project timeline.
In this slide, I’m moving my middle clip to the end of my project timeline.
After you’ve combined your clips and arranged them to your liking, let’s begin the process of saving our video.
Navigate over to the right-hand corner of the "iMovie" application and click on the share button.
![How-to: Edit dashcam footage with a Mac]()
Navigate over to the right-hand corner of the "iMovie" application and click on the share button.

This will open your save options, today we’ll continue by selecting the "File" option to save our
footage
![How-to: Edit dashcam footage with a Mac]()
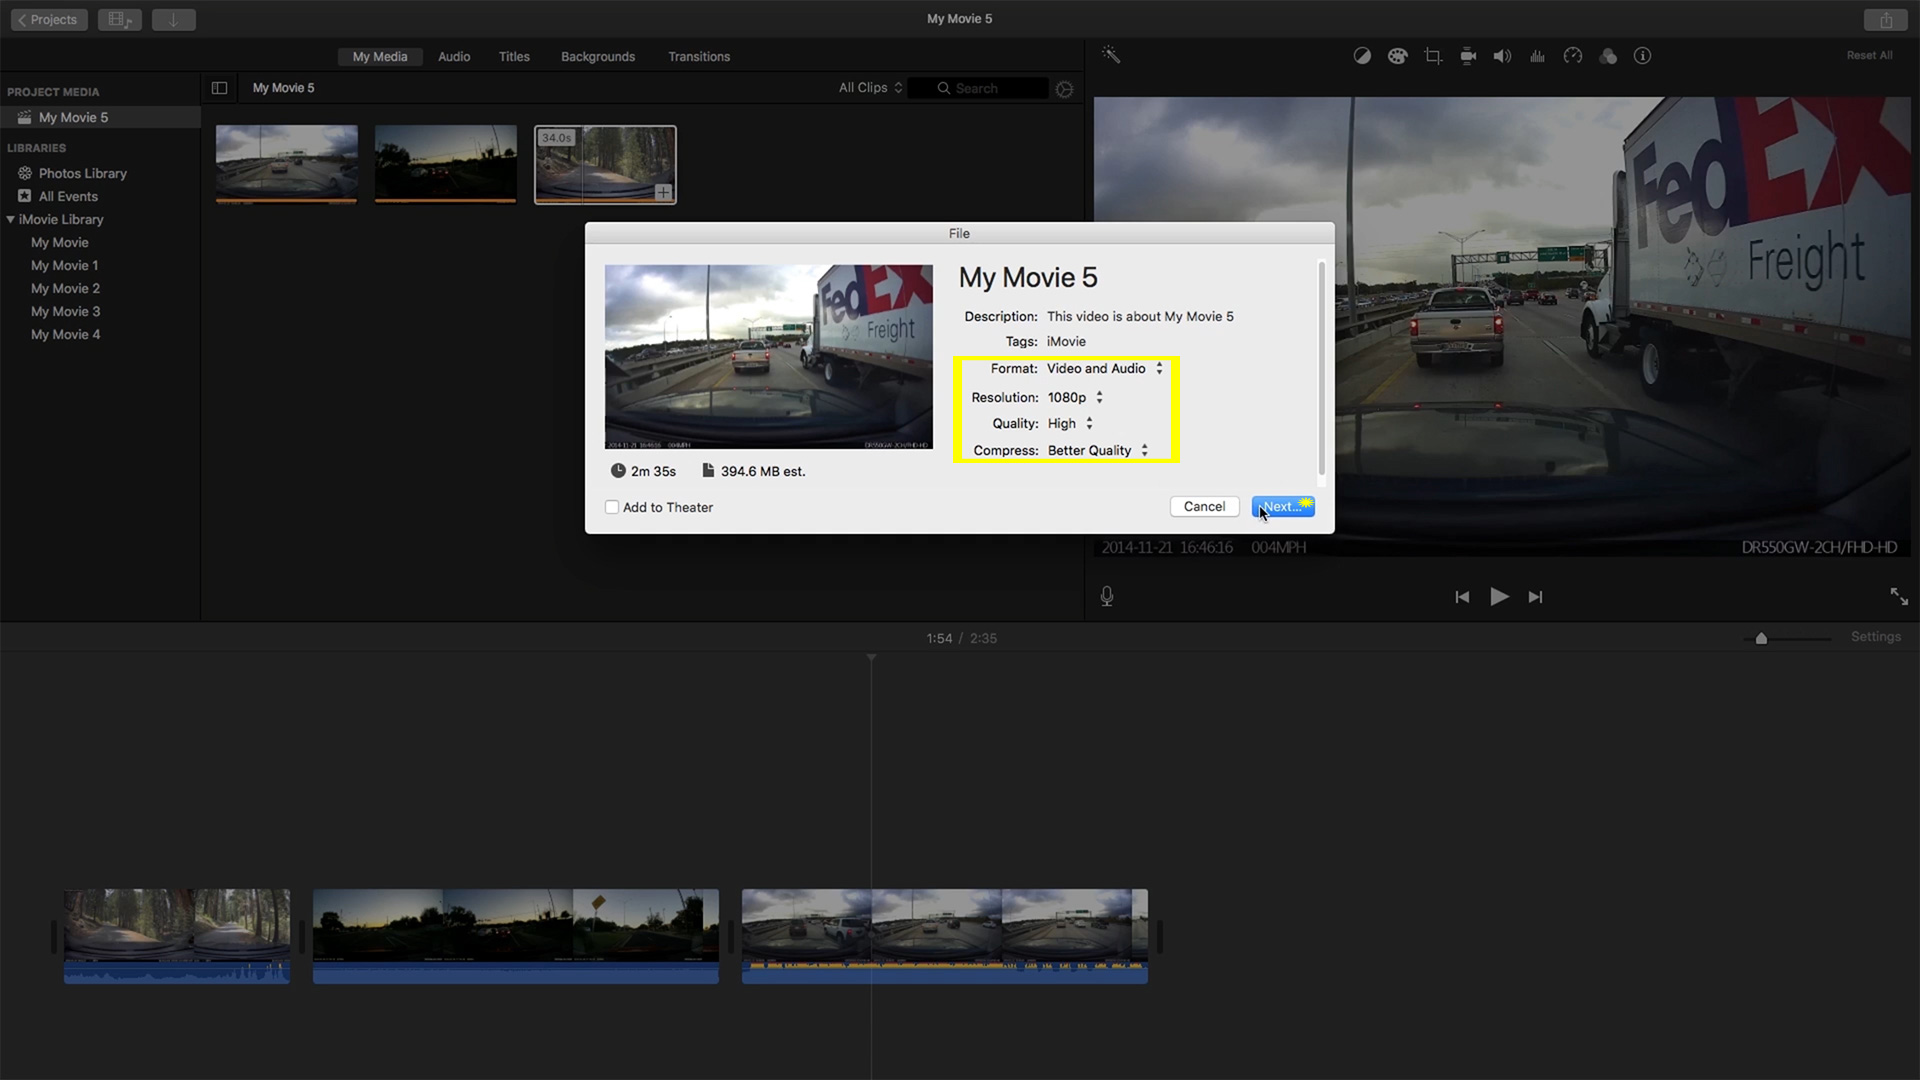
Format – By default allows your video to be saved as "Video & Audio" or if you decide to change
the format, your video can be saved as an "Audio only" file.
Resolution – Will dictate your video’s visual quality. The resolutions 720p & 1080p are considered High Definition, while 540p isn’t. Videos with higher resolution will have a bigger save file because they are retaining more pixel information.
Quality – Dictates both the visual and audio clarity of your finished video. Ranging from low, medium, high, and what "iMovie" states as “best" which is also known as pro res. There’s also a custom option which allows you to manually adjust the megabit information of your video.
And finally, Compression – Think of compression as Blu-ray Vs. DVD. With the "Faster" option being DVD and the "Better Quality" option being Blu-ray.
Then click "Next" when you’re finished adjusting your video options.
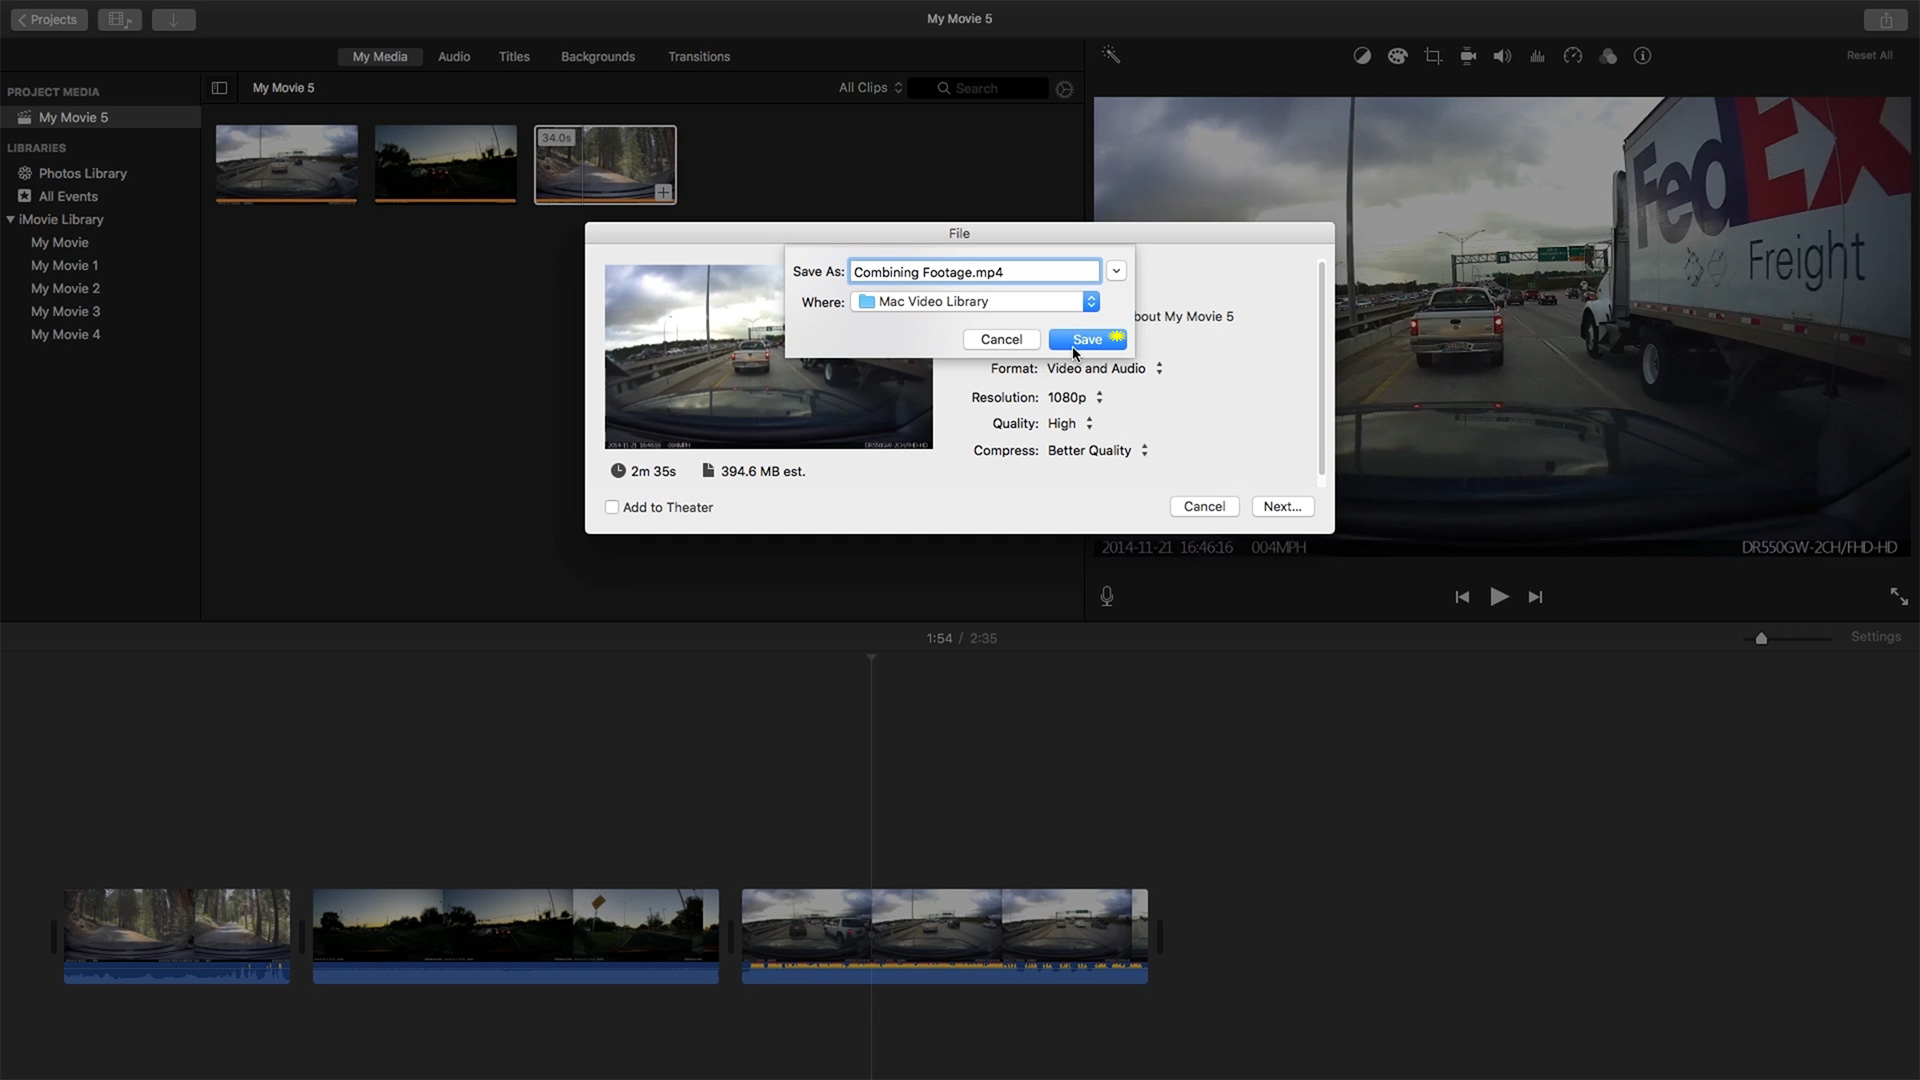
After deciding which options best fit your needs. Let’s name our file and store it in a location that we can easily access. Then click "Save" when you’re done.
![How-to: Edit dashcam footage with a Mac]()
Back to the TopResolution – Will dictate your video’s visual quality. The resolutions 720p & 1080p are considered High Definition, while 540p isn’t. Videos with higher resolution will have a bigger save file because they are retaining more pixel information.
Quality – Dictates both the visual and audio clarity of your finished video. Ranging from low, medium, high, and what "iMovie" states as “best" which is also known as pro res. There’s also a custom option which allows you to manually adjust the megabit information of your video.
And finally, Compression – Think of compression as Blu-ray Vs. DVD. With the "Faster" option being DVD and the "Better Quality" option being Blu-ray.
Then click "Next" when you’re finished adjusting your video options.
After deciding which options best fit your needs. Let’s name our file and store it in a location that we can easily access. Then click "Save" when you’re done.